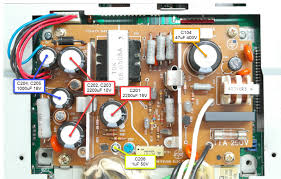
Introduction to Atari ST Power Supply Recapping
The Atari ST Power Supply Recapping, released in the mid-1980s, quickly became a favorite among musicians, programmers, and gamers thanks to its innovative design and affordability. Decades later, many of these machines are still in circulation, often treasured by retro computing enthusiasts. However, age has not been kind to the internal components of these systems. One of the most vulnerable parts is the power supply unit (PSU), where electrolytic capacitors tend to deteriorate over time.
Recapping — the process of replacing old capacitors with new ones — is a vital step in maintaining the reliability and safety of an Atari ST. Without it, your machine risks instability, potential hardware failure, or even complete system shutdown. This article takes you through why recapping matters, what tools and parts you’ll need, and a step-by-step guide to bring your Atari ST power supply back to life.
Why Recapping the Power Supply is Important
The Aging of Electrolytic Capacitors
Electrolytic capacitors are designed with a liquid electrolyte that gradually evaporates or dries out over time. In a machine like the Atari ST, which is now over 35 years old, many of these components have long surpassed their expected lifespan. When capacitors degrade, their ability to filter and stabilize voltages weakens, creating potential for erratic power delivery.
Common Symptoms of Failing Capacitors
Signs of failing capacitors in the Atari ST power supply include random crashes, distorted video output, audible buzzing, or system instability when running demanding software. Sometimes, you may notice a capacitor bulging, leaking, or emitting a burnt smell — clear physical signs that replacement is overdue.
Risks of Ignoring Recapping
Choosing to ignore capacitor issues could have serious consequences. A failing capacitor can cause voltage spikes that damage sensitive chips on the Atari ST’s motherboard. In worst-case scenarios, power supply failures can overheat and pose a fire hazard. Regular recapping is therefore both a preservation strategy and a safety precaution.
Tools and Components Needed for Recapping
Essential Tools for the Job
Recapping requires basic electronic repair tools. At minimum, you’ll need a temperature-controlled soldering iron, solder, desoldering pump or braid, and a multimeter for testing. Tweezers and precision screwdrivers can make the process easier, especially when working with smaller components on the board.
Recommended Capacitor Kits
Many retro hardware specialists sell pre-assembled capacitor kits specifically tailored to the Atari ST’s PSU model. These kits ensure you have the correct values and voltage ratings without needing to cross-reference datasheets. If sourcing capacitors individually, always opt for high-quality, low-ESR brands such as Nichicon, Panasonic, or Rubycon.
Safety Equipment and Precautions
Electronics repair involves risks, particularly when working with power supplies that store residual charge even when unplugged. Safety goggles, insulated gloves, and an anti-static mat are highly recommended. Before handling the PSU, always ensure it is unplugged and discharged to prevent electric shock.
Step-by-Step Guide to Recapping the Atari ST Power Supply
Disassembling the Atari ST Power Supply
Begin by carefully removing the PSU from the Atari ST case. Unscrew the housing and take note of capacitor locations, either by labeling them or taking reference photos. This ensures you reinstall components in the correct orientation.
Removing Old Capacitors
Heat each capacitor’s solder joints with your soldering iron and use a desoldering pump or braid to remove the solder. Gently pull out the capacitor once the leads are free. Be patient — forcing components can damage the circuit board.
Installing New Capacitors
Insert new capacitors in the correct polarity, aligning the positive and negative leads with the board markings. Once in place, solder the leads securely, ensuring strong joints without excess solder blobs. Trim any extra lead length.
After all capacitors are replaced, inspect the board carefully for cold joints, solder bridges, or misplaced parts. A visual inspection is crucial before reassembling the PSU.
Testing and Final Checks
Once reassembled, plug the PSU back into the Atari ST and power it on. Watch for stable operation, a quiet power supply, and smooth system performance. If possible, measure the output voltages with a multimeter to confirm they fall within the correct range.
It’s wise to run the system for a few hours after recapping, testing both idle and heavy workloads to ensure stability. With proper recapping, your Atari ST power supply should deliver reliable performance for many more years, preserving both the safety and functionality of this iconic computer.


