
Business
Shelves Woodworking: The Ultimate Guide for Beginners to Advanced

shelves Woodworking is one of the most satisfying and practical projects you can take on—whether you’re building simple storage in a workshop, elegant built‐ins in a living room, or floating wall shelves that seem to hover. In this comprehensive guide, we’ll walk you through everything you need to know: planning, material selection, joinery, mounting, finishing, and more. Read on and by the end you’ll feel confident customizing your own shelf build.
1. Why Build Your Own Shelves Woodworking Style?
There’s a big difference between buying ready-made shelving and committing to shelving built by you with care and craftsmanship. When you choose shelves woodworking, you gain:
-
Customization: You control the dimensions, style, wood species, finish and placement.
-
Durability: Proper joinery and material selection mean your shelf system will outlast many store-bought units.
-
Aesthetic value: A well-finished wooden shelf adds warmth and character to the space, especially compared with cheap metal or particle-board alternatives.
-
Skill growth: Building shelves is a great way to sharpen woodworking skills—measuring, cutting, joinery, mounting and finishing.
-
Sense of accomplishment: There’s something deeply satisfying about seeing a row of books, prized objects or tools neatly arranged on a shelf you crafted yourself.
And because shelving covers so many use-cases—from storage in the garage to display in the living room—this type of woodworking project offers huge versatility.
That said, woodworking shelves also comes with responsibilities: you must design for strength, plan for the load, select appropriate materials, and finish for longevity. Mistakes in these areas can lead to sagging shelves, unstable mounts or unfinished aesthetics. That’s why we’ll walk through each step deeply.
2. Planning Your Shelves Woodworking Project
2.1 Define Purpose & Location
Start by asking: What will these shelves hold? Where will they sit? The answers determine size, material and mount type. For example:
-
Heavy items (paint cans, tools) need deep shelves, strong supports and robust materials.
-
Display items (books, decor) allow shallower depths but call for clean appearance and finishing.
-
Floating shelves create a minimalist look but require hidden strong support.
2.2 Measure & Span Considerations
How long and deep your shelf will be influences how it’s supported. According to woodworking experts, choosing dimensions carefully avoids sag or failure. Key rules:
-
Select shelf depth based on the largest item you’ll store.
-
The span (distance between supports) matters: longer spans require thicker boards, stiffening or more supports.
-
For example: one guideline: “the eye will notice deflection of 1/32 in per running foot” when loaded.
2.3 Choose Adjustable vs Fixed
Decide if you want adjustability (shelf pins, adjustable brackets) or fixed shelves (cut to space).
-
Adjustable gives flexibility for years of changing use.
-
Fixed often cheaper, faster, and more rigid.
WOOD Magazine’s guide lists many options: shelf pins, adjustable standards, fixed dadoes.
2.4 Sketch & Material List
Create a simple drawing. Mark thickness, widths, bracket/cleat locations, joinery. List every board, fastener, bracket, etc.
Planning ahead prevents unnecessary mistakes.
2.5 Mounting & Wall Considerations
-
If wall-mounted, find studs or solid anchor points; drywall alone won’t suffice for heavy loads.
-
Determine bracket type (cleats, metal brackets, hidden floating support).
-
Consider wall finish, outlet access, wiring or other obstructions. The Spruce article on span and spacing gives excellent mounting guidelines.


3. Materials & Wood Selection for Shelves Woodworking
3.1 Wood Type & Thickness
The choice of material dramatically affects performance and cost. Some options:
-
Solid hardwoods (oak, maple, walnut) – strong, beautiful grain, excellent for visible shelving; more expensive.
-
Softwoods/plywood – more affordable, still acceptable for many uses.
-
Plywood/MDF/particle-board – economical, especially for painted shelves; but thinner versions can sag under heavy load.
Woodwork Center’s DIY guide notes that plywood is a popular strong choice, and that pre-drilling is often required.
3.2 Board Thickness & Supports
To avoid sag, you must select a board thick enough (or add reinforcement) for the span and load. For example: Boards supported only at ends need heavier section, or thinner board with lip/edge or backing. The WOOD magazine guide shows how edging or thicker front can reduce sag by half.
3.3 Front Edging & Appearance
When using plywood, adding a solid wood front edge improves both strength and aesthetics. WOOD guide: “Solid wood glued onto full length of shelf’s front edge adds a great deal of strength… also essential for appearance when you use plywood.”
3.4 Hardware & Brackets
Selecting the right support hardware is crucial. Options include: shelf pins (adjustable), metal bracket arms, cleats (wood or metal), floating shelf brackets. Make sure the rating of bracket matches your projected load.
Better Homes & Gardens guide shows proper method to hang floating shelves.
3.5 Joinery & Construction Methods
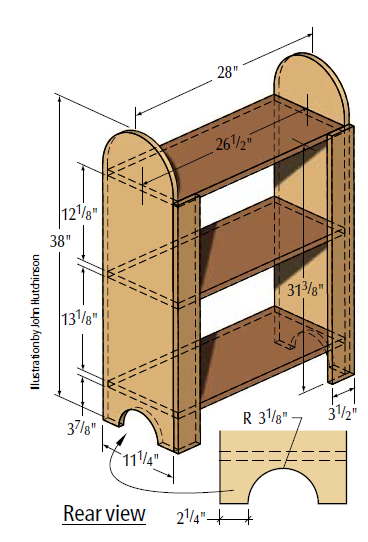
For fixed shelves or built-ins: use dados, rabbets, biscuits, or dowels for strength. The dado joint is common to seat shelf ends into sides for rigidity.
3.6 Finishing & Sealing
Finish protects wood and defines appearance. Decide on stain, paint, clear coat, or natural finish. Ensure finish suits environment (humidor? bathroom?). The Woodwork Advisor article emphasizes finishing and maintenance.


4. Building Techniques for Shelves Woodworking
4.1 Cutting & Layout
Measure twice, cut once. Ensure boards are square, surfaces clean. For custom shelving: cut sides, top, bottom, shelves first. Use table saw or track saw for straight cuts.
From Instructables bookcase build: “Cut the boards for the bookcase… a table saw will provide the safest and most accurate cuts.”
4.2 Joinery and Assembly
-
Use glue + screws or more refined joinery (dowels, biscuits). For visible shelving units you may prefer clean joints.
-
If building built-in shelving, you might cut dados into sides to insert shelf ends. WOOD guide covers this in detail.
4.3 Mounting to Wall / Installing Brackets
-
Use stud finder, mark stud locations.
-
Install cleats or brackets; ensure level and spaced appropriately.
-
For floating shelves, install hidden bracket, slide shelf on, secure underside screws. Better Homes & Gardens method the same.
-
The Spruce article reminds that span and separation matter.
4.4 Reinforcing, Avoiding Sag
For longer shelves or heavy loads:
-
Use thicker boards or support in middle.
-
Use edge banding or front lip to reduce deflection. WOOD guide: added edging reduced sag by half.
-
Consider adding vertical support under shelf, especially for wide spans. Real-world reddit users recommend mid-supports for long spans.
4.5 Finishing the Shelf
After build: sand to smooth, apply stain or paint, then finish coat (polyurethane, oil, wax). Consider rounding front edge for safety and visual appeal. The Woodwork Advisor article suggests stain/wipe finish and protective topcoat.


5. Types of Shelves Woodworking: Styles and Ideas
5.1 Floating Wall Shelves
These shelves appear to have no visible brackets—clean and modern. But installation requires hidden hardware, strong wall anchor and careful finishing. WOOD magazine has a plan for floating wall shelves.
5.2 Fixed Built-In Shelves / Bookcases
Traditional built-in shelving units anchored to walls, often with side panels, back panels and fixed shelf heights. Durable and elegant. WOOD magazine’s “Shelves for Show” is an example.
5.3 Adjustable Shelves
Shelves where height can be changed via shelf pins or adjustable standards. Very versatile. Wikipedia article on adjustable shelving explains.
5.4 Stackable / Modular Shelves
Modules that can be stacked vertically or arranged laterally. Great for flexible storage. The Minwax beginner project shows stackable shelves.
5.5 Tool / Workshop Shelves
Heavy‐duty shelving designed for garage or workshop storage of heavy tools, lumber or hardware. Example: tool storage shelves plan.
5.6 Specialty Shelves
Corner shelves, floating hexagon shelves, narrow display ledges—many creative woodworking shelves ideas. Pinterest boards reflect many inspirations.
6. Mounting & Installation Best Practices
6.1 Finding Studs & Anchors
For wall‐mounted shelves, always locate studs or use strong anchors. Studs spaced 16-24” apart typical. The Spruce article outlines material span and support.
6.2 Leveling and Spacing
Use a level for straight installation. For multiple shelves, measure equal vertical spacing. Clear shelf height determined by objects you store.
6.3 Shelf Span & Support Spacing
The longer a shelf span without support, the greater the sag risk. Use brackets or support mid‐span if shelf is wide. Reddit woodworking users frequently discuss this.
6.4 Secure Brackets and Hidden Supports
In floating shelves especially:
-
Drill pilot holes into studs.
-
Secure braces tightly.
-
Slide shelf onto bracket then screw underside to prevent sliding. Better Homes & Gardens gives a clear step by step.
6.5 Final Stabilization & Load Testing
Before adding heavy items:
-
Check for sway.
-
Place increasing weights gradually.
-
Tighten screws after first week (wood may settle).
-
Avoid placing heavy loads far out on a shelf edge without support.
7. Finishing, Maintenance & Longevity
7.1 Finishing Techniques
-
Staining: Enhances grain and color—apply evenly, wipe off excess.
-
Clear Finish: Polyurethane, lacquer or oils protect the wood surface.
-
Paint: For sleek look or matching décor—ensure good primer.
Woodwork Advisor gives finishing advice for wood wall shelves.
7.2 Maintenance
-
Dust regularly.
-
Avoid soaking wood with water—wipe damp, then dry.
-
Tighten loose screws and brackets annually.
-
Monitor sagging over time, especially if load changes.
-
For painted shelves: touch-up chips as soon as they occur to protect underlayer.
7.3 Avoiding Problems
Common issues and fixes:
-
Sagging mid-span → add central support, reduce span, increase thickness.
-
Warping → choose stable wood, acclimate boards to room humidity, allow expansion.
-
Finish peeling → ensure proper surface prep and use high‐quality finish.
-
Mount failure → ensure brackets anchored in studs or use proper drywall anchors rated for load.
8. Common Mistakes in Shelves Woodworking & How to Avoid Them
Mistake #1: Under-estimating the load or span
If you use thin boards for long spans to hold heavy items, you’ll face sag or failure. The Spruce article warns of span/spacing risks.
Fix: Choose thicker wood, add supports or reduce span.
Mistake #2: Mounting only to drywall
Drywall anchors alone might fail under significant weight.
Fix: Always anchor to studs or use heavy‐duty anchor/plate system rated appropriately.
Mistake #3: Poor finish prep
Untreated or poorly sealed wood will chip, stain and wear quickly.
Fix: Sand well, remove dust, apply suitable finish.
Mistake #4: Mis-measuring and cutting
A small error in width or square will show up dramatically.
Fix: Measure twice, clamp and test fit before final glue. The Instructables build stresses accuracy.
Mistake #5: Ignoring fail-safe support
Even aesthetic shelf designs need enough structure. Reddit woodworkers warn about long spans without center support.
Fix: Add central support for spans beyond ~3 feet, or use thicker material.
9. Advanced Tips & Creative Ideas for Shelves Woodworking
-
Hidden hardware / floating look: Use concealed brackets for minimalist look.
-
Mixed materials: Combine wood with metal brackets, glass shelf tops or leather accents.
-
Live edge shelving: Use live edge boards for dramatic, natural look.
-
Integrated lighting: LED strips beneath shelf or inside built‐in units create ambience.
-
Custom joinery: Use dovetail or through‐tenon joinery for visible craft detail.
-
Modular units: Build stackable shelving modules that adapt to changing space. The Minwax beginner project explores stackables.
-
Corner shelving / sloped ceilings: Use templates and angled cuts for tricky spaces. Reddit users discuss this challenge.
10. Cost, Time & Tools Breakdown for Typical Shelves Woodworking Projects
Time
-
Simple wall shelf: a couple of hours (cut, sand, finish, mount).
-
Built-in bookcase: several days (cutting, joinery, assembly, finishing).
-
Floating shelf system wall-wide: several sessions (measurement, bracket install, checking for level, finish, mount).
Cost
Depends heavily on wood species, hardware and finishing.
-
Budget materials (plywood + brackets): low cost.
-
Premium hardwood + custom finish + heavy duty hardware: higher cost.
Make sure to budget for finishing materials and possible extra support hardware if load high.
Tools
Essential tools include: measuring tape, level, stud finder, drill/driver, table or track saw (optional but helpful), clamps, sander, finishing supplies.
More advanced joinery requires router, biscuit joiner, dado set, etc. The Woodwork Center article outlines tool needs.
Conclusion
Shelves woodworking is a rewarding craft that blends utility, design and personal satisfaction. Whether you’re building a basic wall shelf or a full built-in system, giving attention to planning, materials, construction and finishing makes all the difference. Keep in mind:
-
Match shelf design to intended use.
-
Respect span, load and support requirements.
-
Choose material and finish wisely.
-
Install accurately and securely.
By following these principles, your wooden shelves will not only perform well today—they’ll stand the test of time. So grab your saw, measure carefully, and build something you’ll be proud of.
FAQs
1. How deep should a shelf be for general storage?
Depth depends on what you store. For books/display: ~10-12″ is common. For tools/larger items: 16″ or more may be needed. Always measure your items first.
2. What thickness of board should I use for a 4′ span?
For typical solid wood board under moderate load, ¾″ may suffice for ~30–36″ spans. For 4′ plus heavy items, consider 1″ thick board or support every ~18–24″. See span guidelines.
3. Can I use MDF or particle-board for shelving?
Yes, for lighter loads and painted finishes MDF/particle can work. But they sag faster under heavy load or wide spans. The Spruce article suggests caution.
4. How do I install floating wood shelves safely?
Locate studs, install hidden bracket firmly, slide shelf on, then secure from underside with screws to prevent slipping. Level and test before loading.
5. What finish should I use to protect wooden shelves?
Depends on look and use. Clear polyurethane gives durable protection. Oil finishes bring out natural grain. Painted finishes require good primer and top coat. The Woodwork Advisor article covers finishing.


Brands love to talk about “engagement” as if it’s a dial on a dashboard. It isn’t. Emotional connection forms in the messy places where people laugh at the same time, wince at the same time, and look around to confirm that everyone else felt it too. A live experience, shared with strangers or colleagues, turns a logo into a witness. That matters. Memory sticks to witnesses. A campaign can shout, a sponsorship can loom, and a social post can beg for hearts, yet a well-made event can make a brand feel like part of someone’s own story. Stories beat slogans. Every time.
The Crowd Does the Heavy Lifting
Shared events do not persuade through facts. They persuade through synchrony. A room claps, and a person joins in because the moment feels right, and humans copy other humans when the stakes feel social. Brands benefit when they design the conditions for that synchrony without smothering it. People remember belonging, then attach that feeling to the name on the lanyard or the stage backdrop. Production support also matters. A technically clean show removes friction and lets emotion run. Event resources, such as Massive (massive.co.uk), fit naturally into that wider planning context because logistics, sound, lighting, and pacing can decide whether the crowd bonds or fidgets. Nobody bonds while waiting for a broken mic.
Ritual Beats Messaging
Marketing departments adore messaging. Humans adore ritual. A chant, a countdown, a collective toast, a shared silence before the first note – these act like social glue. The brand that hosts the ritual doesn’t need to nag for attention because the ritual pulls attention in. Even simple repeated acts work. A yearly product reveal, a fan convention, a community run, and a pop-up with a signature moment. People anticipate the pattern, then treat attendance as proof of membership. That membership becomes emotional equity. Repetition creates comfort. Comfort creates trust. Trust creates forgiveness when the brand later slips.
Risk, Surprise, and the Electric Memory
A live setting carries risk. The weather turns. A performer fluffs a line. A demo crashes. That risk sharpens attention, and focus sharpens memory. Safe experiences drift into beige nothingness. Surprise also plays its part. An unexpected guest. A sudden change of lighting. A reveal timed to a collective inhale. The brain flags novelty as important, then files it under “keep”. Done well, the surprise feels generous rather than manipulative. The brand looks confident, not needy. Confidence reads as competence. Competence reads as worthy of loyalty.
From Attendance to Identity
The strongest live experiences don’t end at the exit doors. They migrate into identity. People say, “That was our night”, not “That was their event”. The brand wins when attendees carry the story into group chats, photos, office banter, and even gentle bragging. Social sharing matters, yet the deeper point sits elsewhere. The event gives people a token of identity, a badge without the cringe. Behaviour matters more than merchandise. A brand that treats guests with calm competence, good signage, decent queues, and staff who act like humans earns emotional space. Neglect the basics, and the identity turns sour.
Conclusion
Emotional connection with a brand grows when people feel something together and can’t separate the feeling from the setting that produced it. Live experiences do that because they operate on bodies, not just minds. Sound hits the chest. Lights change the room. A crowd rewrites the meaning of a moment by reacting in unison. Brands that chase this experience should stop obsessing over the volume of impressions and start judging the quality of collective feeling. The goal isn’t a perfect showpiece. The goal is a memory people defend. That defence turns into preference on the shelf, patience during a mistake, and advocacy when nobody asks.

Running a business means preparing for the unexpected. While you can’t predict every challenge that might come your way, you can build resilience into your operations to minimize the impact of disruptions when they occur.
From natural disasters to equipment failures, supply chain issues to cyber attacks, unexpected events can bring business operations to a standstill. The companies that survive and thrive are those that have invested time and resources in comprehensive preparation strategies.
This guide will walk you through practical steps to protect your business from unforeseen disruptions, helping you maintain continuity and recover quickly when challenges arise.
Identify Your Business’s Vulnerabilities
Before you can protect your business, you need to understand where you’re most at risk. Conduct a thorough assessment of your operations to identify potential points of failure.
Start by examining your physical infrastructure. Are you heavily dependent on specific equipment or facilities? Consider what would happen if your main office became inaccessible or if critical machinery broke down. For instance, if your business relies on hot water for manufacturing processes, having a plan for water heater repair in Layton or your local area could prevent costly downtime.
Next, evaluate your digital dependencies. How would a server crash, internet outage, or cyber attack affect your ability to serve customers? Many businesses today rely heavily on cloud services, customer databases, and digital communication tools.
Don’t overlook your human resources either. What happens if key employees are unavailable due to illness, family emergencies, or other circumstances? Cross-training staff and documenting critical processes can reduce your dependence on any single individual.
Finally, assess your supply chain vulnerabilities. Are you overly reliant on a single supplier for critical materials or services? Diversifying your supplier base can help ensure continuity even when one source experiences problems.
Create a Comprehensive Emergency Response Plan
A well-documented emergency response plan serves as your roadmap during crisis situations. This plan should outline specific actions to take for different types of disruptions.
Start with immediate response procedures. Who needs to be contacted first? What steps should be taken to ensure employee safety? How will you communicate with customers about service disruptions? Having these decisions made in advance prevents confusion and delays during actual emergencies.
Include detailed contact information for emergency services, key suppliers, insurance companies, and backup service providers. For example, if your facility’s heating system fails during winter, you’ll want quick access to reliable water heater repair in Layton specialists or similar services in your area.
Your plan should also address communication strategies. How will you keep employees informed? What channels will you use to update customers? Consider multiple communication methods since your primary systems might be affected by the disruption.
Don’t forget to establish clear decision-making authority. Designate who has the power to make critical decisions when regular management isn’t available. This prevents paralysis during emergencies and ensures swift action.
Build Redundancy Into Critical Systems
Redundancy is your safety net when primary systems fail. Identify the most critical aspects of your operation and create backup solutions for each.
For data protection, implement regular backup procedures that store information in multiple locations. Cloud storage combined with local backups provides multiple layers of protection. Test these backups regularly to ensure they’re working properly and can be restored quickly.
Consider backup power solutions for essential operations. Generators, battery backup systems, or agreements with alternative facilities can keep critical functions running during power outages.
Establish relationships with backup suppliers and service providers. While you might prefer working with your regular vendors, having alternatives ready ensures you can quickly pivot when your primary sources are unavailable.
Cross-train employees on essential functions. When key team members are unavailable, others should be able to step in and maintain basic operations. Document procedures clearly so anyone can follow them when needed.
Establish Strong Financial Reserves
Financial resilience is crucial for surviving unexpected disruptions. Many businesses fail not because they can’t recover operationally, but because they lack the financial resources to weather extended downtime.
Build an emergency fund specifically for business disruptions. This should be separate from your regular operating capital and easily accessible when needed. Financial experts often recommend having three to six months of operating expenses set aside.
Review your insurance coverage regularly to ensure it adequately protects against likely risks. Business interruption insurance can provide income replacement during extended closures, while equipment coverage can help with repair or replacement costs.
Consider establishing a line of credit before you need it. Banks are more willing to provide credit to stable businesses than to those already experiencing difficulties. Having pre-approved credit available gives you immediate access to funds during emergencies.
Test and Update Your Plans Regularly
A plan that sits on a shelf gathering dust won’t help during real emergencies. Regular testing and updates ensure your strategies remain effective and relevant.
Conduct periodic drills to test different aspects of your emergency response plan. Practice communication procedures, test backup systems, and walk through evacuation procedures. These exercises reveal gaps in your planning and help employees become familiar with emergency procedures.
Schedule regular reviews of your business continuity plans. As your business grows and changes, your vulnerabilities and needs evolve too. Update contact information, revise procedures to reflect operational changes, and incorporate lessons learned from actual incidents or drills.
Stay informed about emerging risks in your industry and geographic area. New threats require new preparations, whether they’re technological, environmental, or economic in nature.
Strengthen Your Business’s Resilience Today
Protecting your business from unexpected disruptions requires ongoing commitment and investment, but the cost of preparation pales in comparison to the potential losses from being unprepared. Start by conducting a thorough risk assessment, then systematically address each vulnerability you identify.
Remember that business continuity planning is not a one-time project but an ongoing process. As your business evolves and new risks emerge, your protective measures should adapt accordingly. By taking proactive steps now, you’re not just protecting your current operations—you’re building the foundation for long-term business success and resilience.


Is Hizzaboloufazic Good or Bad? Full 2025–2026 Analysis & Safety Review

Sustore: What “Sustore” Means Across E-Commerce, Retail, and IT

Best Pollo Al Chilindrón Near Me (2026): Where to Find This Classic Spanish Chicken Dish
-
 FOOD MARKET1 week ago
Best Pollo Al Chilindrón Near Me (2026): Where to Find This Classic Spanish Chicken Dish
-
 Business1 week ago
Sustore: What “Sustore” Means Across E-Commerce, Retail, and IT
-
 Blog2 days ago
Is Hizzaboloufazic Good or Bad? Full 2025–2026 Analysis & Safety Review
-
Business1 week ago
How Shared Live Experiences Create Stronger Emotional Connections with Brands