
Blog
How to Cut Perspex Acrylic Sheet – Complete Step-by-Step Guide (2026)
Perspex (acrylic) sheets are widely used in DIY projects, signage, windows, display cases, and home improvements because they are lightweight, durable, and crystal clear. However, cutting acrylic incorrectly can lead to cracks, chips, or melted edges.
The good news is that with the right tools and techniques, anyone can cut Perspex sheets safely at home. Whether you’re working with thin sheets using a utility knife or thicker panels using power tools, this guide explains the best methods and tips to achieve clean and professional results in 2026.
1. What Is Perspex Acrylic Sheet?
Perspex is a brand name commonly used for acrylic plastic sheets, also known as PMMA (Polymethyl Methacrylate). It is often used as a lightweight alternative to glass.
Key Features of Acrylic Sheets
Some important advantages include:
-
High transparency (up to 92% light transmission)
-
Strong and impact resistant
-
Weather and UV resistant
-
Easy to cut and shape
Because of these features, Perspex is popular in industries such as construction, crafts, retail displays, and furniture design.
Why Proper Cutting Is Important
Improper cutting can cause:
-
edge chipping
-
surface scratches
-
melting from excessive heat
-
cracking under pressure
Using the correct technique ensures clean cuts and longer material life.
2. Tools Needed to Cut Perspex Acrylic
Before starting, it’s important to gather the right tools and safety equipment.
Basic Tools for Cutting Acrylic
Depending on the sheet thickness, you may need:
-
Utility knife or acrylic scoring tool
-
Metal ruler or straightedge
-
Clamps
-
Jigsaw
-
Circular saw
-
Bandsaw
Safety Equipment
Always prioritize safety when cutting plastic materials:
-
Safety glasses
-
Dust mask
Important Preparation Tip
Leave the protective plastic film on the sheet during cutting. This prevents scratches and surface damage.
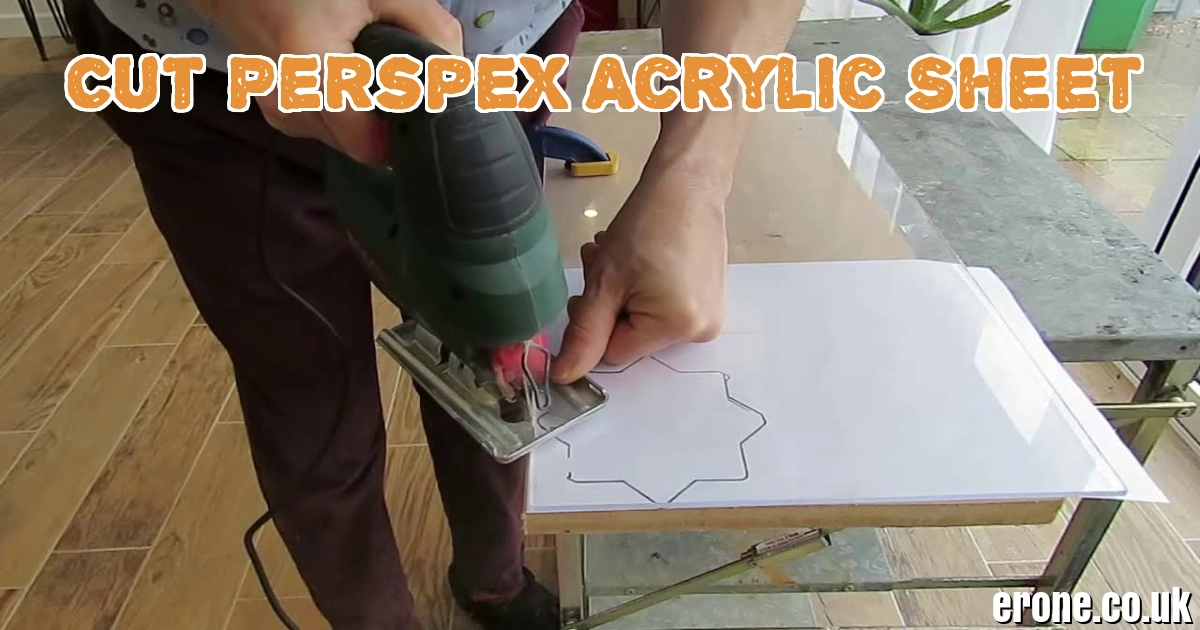
3. Scoring and Snapping Method (Best for Thin Sheets)
For thin acrylic sheets (usually under 3 mm), the easiest method is scoring and snapping.
Step-by-Step Process
-
Place the acrylic sheet on a flat work surface.
-
Align a metal ruler along the cutting line.
-
Use a utility knife or plastic scoring tool.
-
Score the line 6–10 times firmly.
-
Move the sheet to the edge of the table.
-
Apply pressure to snap the sheet along the scored line.
Advantages of This Method
-
Requires no power tools
-
Ideal for DIY and home projects
-
Produces straight clean cuts
This method is demonstrated in many tutorials, including this short video guide:
https://www.youtube.com/watch?v=3ZWlJn0sBaQ
4. Cutting Perspex with a Jigsaw
If you need curved shapes or small detailed cuts, a jigsaw is a great option.
How to Use a Jigsaw on Acrylic
Follow these steps:
-
Secure the sheet using clamps.
-
Use a fine-tooth blade designed for plastic or metal.
-
Set the jigsaw to low speed.
-
Cut slowly along the marked line.
Important Tip
If the acrylic begins to melt or stick to the blade, it means the speed is too high or the blade is dull.
This video demonstrates cutting acrylic with tools:
https://www.youtube.com/watch?v=KmHxgnfv1fo
5. Using a Circular Saw for Thick Acrylic Sheets
For thicker Perspex panels or long straight cuts, a circular saw provides the best results.
Best Blade for Acrylic
Use a blade with:
-
High tooth count
-
Fine teeth
-
Plastic or metal cutting design
Cutting Technique
To avoid cracking or melting:
-
Use a slow and steady feed rate
-
Keep the sheet firmly clamped
-
Avoid forcing the blade through the material
Circular saws are commonly used for large panels used in construction or signage.
6. Finishing and Smoothing the Edges
After cutting acrylic sheets, the edges may appear rough or slightly sharp.
How to Smooth the Edges
You can improve the finish using:
-
Fine sandpaper (600–1000 grit)
-
Metal file
-
Polishing compound
Professional Finishing Tips
For a clean result:
-
Sand gently in one direction
-
Remove dust with a soft cloth
-
Optional: use plastic polish for a glossy edge
Proper finishing gives the acrylic a professional glass-like appearance.
Conclusion
Learning how to cut Perspex acrylic sheets correctly is essential for achieving clean, safe, and professional results in DIY projects or professional installations. Thin sheets can easily be cut using the scoring and snapping method, while thicker panels require tools like jigsaws or circular saws with fine-tooth blades.
Always remember to wear safety equipment, keep the protective film on the sheet, and cut at a slow, steady speed to prevent melting or cracking.
With the right techniques and tools, cutting acrylic becomes simple, efficient, and highly accurate, making Perspex one of the most versatile materials for modern design, construction, and crafting projects in 2026.

Introduction
More and more people are asking the question: Is Hizzaboloufazic good or bad? after seeing Hizzaboloufazic on social media, forums, and marketplaces. As of June 2026, the evidence collected so far is worrying. Currently, Hizzaboloufazic cannot be classified as a medication, supplement, a legitimate chemical compound, or an approved treatment based on evidence from the science, medicine, or regulatory frameworks.
A lack of evidence is a red flag. In the case of wellness products, if evidence exists, but cannot be verified independently, the product should be approached with caution. To protect yourself from loss of both health and finances, it is your right to know what information exists concerning Hizzaboloufazic and what is yet to be discovered.
What is Hizzaboloufazic?

Is Hizzaboloufazic Good or Bad?
One of the issues regarding Hizzaboloufazic is that it is not found in any of the major medical or pharmaceutical databases. Searches of the FDA database, the WHO INN registry, PubMed, NIH supplement databases, and major pharmacy databases have not recorded any substances or products approved with this name.
This can mean a few things:
- It may be a completely new and unregulated, unsafe, compound.
- It may be a spelling error or another name of a substance.
- It may be a product name that was made up and used in scams and very poor advertisements.
A legitimate supplement or medication should offer disclosures of ingredients, and dosages, name the manufacturer, and provide supportive research. At this point, Hizzaboloufazic offers none of these basic components. Without these disclosures, consumers have no idea what they truly are ingesting.
The bottom line is any product that does not have verified ingredients and safety studies, and is void of any regulation, should be considered unsafe.
Why Are People Searching “Is Hizzaboloufazic Good or Bad”?
The interest in Hizzaboloufazic rapidly expanded in 2025 and the early part of 2026. This was especially true in TikTok, Reddit, Telegram groups, and other online discussion forums. Many of the posts claimed that the substance offered the following improvements:
- Energy
- Mental focus
- Weight loss
- Mood
- Productivity
The problem with these claims is the lack of supporting evidence. These substances are not verified by published clinical trials or peer-reviewed studies.
Many other suspicious supplements have similar advertising. Some of the most popular claims are:
- “Doctors are trying to cover this up!”
- “The secret supplement big pharma is scared of!”
- “Proven to work or else we’d be in jail!”
These claims are designed with an intention to create a sense of urgency and interest, but are most often associated with a grey-area supplement, scam product or an unregulated substance.
Without any type of research, it is impossible to tell if the benefits of this substance truly exist, if they are more, or less, than what is claimed, or if there is any truth to them at all.
What Are the Risks of Taking Substances Like Hizzaboloufazic?
When there is no science to document a product, those risks are amplified. The general consensus of health science is to avoid anything that is unregulated.
Unknown Ingredients
Undisclosed ingredients are a major concern. Without lab testing or a validated Certificate of Analysis (COA), we can’t know if a product has:
- Stimulants
- Prescription drugs
- Steroids
- Heavy metals
- Toxic chemicals
Dangerous Drug Interactions
Unknown ingredients may also interact with:
- Antidepressants
- Blood pressure meds
- Blood thinners
- Meds for anxiety
Interactions with these can be dangerous.
Contamination
Unsanitary production facilities that are not properly regulated can lead to contamination from:
- Bacteria
- Mold
- Solvents
- Toxic residue
Legal Risks
Some products being sold online are actually research chemicals or controlled substances. Possessing or importing these substances may break laws in your country or region.
Hizzaboloufazic has no verified safety profile so the risks likely outweigh the benefits.
Safety Checklist for Hizzaboloufazic

Is Hizzaboloufazic Good or Bad? Full 2025–2026 Analysis
Evaluate the following criteria before using any supplement or wellness product.
| Criteria | Good Signal | Bad Signal/Red Flag |
|---|---|---|
| Regulatory Status | Approved | no research or “for research only” status |
| Scientific Research | Clinical studies and PubMed | only social media |
| Transparency | Ingredient list with dosages | proprietary or hidden ingredients |
| Source | Licensed pharmacy or healthcare provider | Telegram/TikTok shop, anonymous website |
Currently, Hizzaboloufazic has no safety checks. It has no regulatory approval, no research, no transparency for ingredients, and no reputable sources.
Therefore, consumers that are health-centered should put it in the category of “avoid until proven safe.”
What doctors and pharmacists will say in 2026
Medical professionals urge caution when taking any risks with the unknown. The same goes for unidentified substances. Toxicologists and pharmacists encourage the avoidance of any pill, powder, capsule, liquid, etc. that:
- Is untraceable in any of the drug databases.
- Is marketed without an honest ingredients listing.
- Makes medical claims that are substanceless.
- Is sold without the appropriate authorizations or oversight.
If someone has already taken the product marketed as Hizzaboloufazic and is experiencing:
- Rapid heart rate
- Heart Palpitations
- Dizziness
- Nervousness
- Nausea
- Shortness of Breath
then that person should be evaluated by a medical professional.
In Pakistan, people experiencing more severe symptoms can dial 1122 or visit a qualified doctor as soon as possible. The same emergency services are available in most other countries.
The same conclusions should be valid for any online substance that has become popular. These should standardly be treated with care.
Common scam patterns for products marketed as Hizzaboloufazic that follow these popular trends
Most dubious products strive to put a scientific veneer on substance. These schemes tend to follow a popular but recognizable pattern.
Common Red Flags:
- Fake Before and After Photos
- Claims of Breakthrough Results in Days
- Countdown Timers to generate a false sense of urgency
- No Working Corporate Address
- Limited Payment to Cryptocurrency or Wire Transfers
- Affiliate Marketing Influencer Sales with no other promotion
- No Customer Support or Refunds
The legitimate products that make it to market do not rely on research for supports claims and do not take regulatory oversights. They have not let their existence depend on unsupported marketing claims that will make them viral and the rest of the offending marketing campaigns.
When sellers fail to provide verified documentation, scientific evidence, or regulatory numbers, consumers are right to view this with suspicion.
Healthier Substitutes for Managing Energy, Focus, Mood, and Weight
Most people looking for Hizzaboloufazic are searching for a way to manage their health or improve their performance. The good news is there are safer, evidence-based solutions.
Energy Management
Try measuring:
- Iron
- Vitamin B12
- Vitamin D
Studies also support a combination of caffeine and L-theanine, as this can lead to greater alertness without the jitters.
Focus Management
Some evidence-based ways to improve focus include:
- Consistent sleep patterns
- Regular exercise
- Limiting screen distractions
- Adhd evaluation
Mood Management
Health care providers usually suggest:
- Cognitive Behavioral Therapy (CBT)
- Omega-3 fatty acids
- Stress management techniques
- Crisis medications (if applicable)
Weight Management
Some of the safer, more evidence-based ways to achieve weight loss include:
- Establishing calorie deficits
- Increasing protein intake
- Safe exercise
- Supervised weight loss medications, including GLP-1s
You should consult a licensed health care professional prior to starting any new supplements or medications.
Final Verdict: Should Hizzaboloufazic Be Used in 2026?
When you view the evidence that is currently available, this is a very simple question to answer.
Current Verdict: Bad / Avoid
There is no science supporting Hizzaboloufazic as safe, effective, or real. There are also no trials, ingredient lists, approvals, or other references for its use in the pharmacy.
If there is a lack of peer-reviewed studies and safety studies, Hizzaboloufazic should be considered a potential health risk rather than a health solution.
If you’re being told to try Hizzaboloufazic, you should ask the following:
“Can you give me the clinical trial registration number or the documentation for FDA approval?”
If the response is no, you should avoid it for that reason alone.
What Should You Do After Seeing Hizzaboloufazic?
- Avoid buying or taking Hizzaboloufazic until a verified medical professional has confirmed it to be safe.
- Report any ads that promote Hizzaboloufazic on TikTok, Instagram, Facebook, or any other platform.
- Consult your doctor if you have already taken Hizzaboloufazic and have concerns about your health.
- Tell friends and family the truth about Hizzaboloufazic to help keep them safe.
Frequently Asked Questions
Is Hizzaboloufazic a real medication?
Currently, Hizzaboloufazic cannot be classified as a medication, supplement, a legitimate chemical compound, or an approved treatment based on evidence from the science, medicine, or regulatory frameworks.
Is Hizzaboloufazic approved by the FDA?
Searches of the FDA database have not recorded any substances or products approved with this name.
What are the risks of taking Hizzaboloufazic?
Potential risks include unknown ingredients, dangerous drug interactions, contamination, and legal risks.
Why are people searching for Hizzaboloufazic?
Many online posts claim benefits related to energy, mental focus, weight loss, mood, and productivity.
Should I use Hizzaboloufazic in 2026?
Current Verdict: Bad / Avoid.
Conclusion
There is no science supporting Hizzaboloufazic as safe, effective, or real. There are also no trials, ingredient lists, approvals, or other references for its use in the pharmacy. If there is a lack of peer-reviewed studies and safety studies, Hizzaboloufazic should be considered a potential health risk rather than a health solution.
Notice
The information presented here is readable and understandable for the average person. It is not to be considered medical advice. You should go to a healthcare professional if you need support with your health.
We all experience periods of intense pressure. A looming deadline, a sudden life change, or a demanding schedule can leave anyone feeling drained. You might notice tight shoulders, a racing heartbeat, and an urgent desire to just lie down. This is a normal human response to challenging situations.
Identifying Normal Stress
Stress is your body’s physical and mental reaction to a challenge. It is not inherently bad. In fact, short bursts of stress can keep you alert and help you avoid danger.
Common Triggers
Everyday stressors usually have a clear source. You might feel tense because of an upcoming job interview, financial worries, or an argument with a family member. Once the triggering event passes, the stress typically fades away.
The Fight or Flight Response
When your brain perceives a threat, it floods your system with hormones like adrenaline and cortisol. This is the “fight or flight” response. Your heart rate increases, your breathing quickens, and your muscles tense up. This biological mechanism is designed to help you survive immediate danger.
Physical Symptoms
Standard stress brings a host of noticeable physical symptoms. You might experience tension headaches, an upset stomach, or difficulty falling asleep. While uncomfortable, these symptoms generally resolve once you have a chance to rest and process the stressful event.
Understanding Chronic Fatigue
Chronic fatigue is entirely different from the tiredness you feel after a long week. It is a profound, relentless exhaustion that does not improve with sleep.
People experiencing chronic fatigue often wake up feeling just as tired as when they went to bed. This condition affects your cellular energy production. Your body simply cannot generate the power it needs to function normally. Rest alone cannot fix this level of depletion.
Signs of chronic fatigue include brain fog, muscle weakness, and joint pain without any clear cause. You might also notice that physical or mental exertion triggers a massive crash in your energy levels. A short walk might leave you bedbound for the next two days.
The Intersection of Stress and Fatigue
How do we cross the line from standard tension to chronic exhaustion? The answer lies in the duration of the pressure.
When stress becomes a permanent fixture in your life, your fight or flight response never turns off. Your body constantly pumps out cortisol. Over time, this overworks your adrenal glands and disrupts your nervous system. Your body essentially burns through its energy reserves and forgets how to rest.
Prolonged, unmanaged stress acts as a direct catalyst for chronic fatigue syndrome. The body eventually shuts down to force you to stop. The transition is rarely sudden. It usually happens slowly, with your baseline energy dropping slightly month after month until you hit a wall.
Key Differences You Should Know
Telling the two apart requires looking at your recovery patterns and overall capacity.
Recovery Times
If you are dealing with regular stress, a quiet weekend or a short vacation will usually recharge your batteries. You will return to work feeling somewhat refreshed. With chronic fatigue, a week of rest barely makes a dent in your exhaustion.
Energy Levels
Stress might make you feel wired, anxious, and hyper-alert. You might feel tired, but you can still push through the day using sheer willpower. Chronic fatigue physically prevents you from pushing through. The energy tank is empty, and trying to force yourself to work only deepens the exhaustion.
Psychological Impact
Stress often brings anxiety, irritability, and racing thoughts about the future. Chronic fatigue, on the other hand, frequently causes a sense of cognitive heaviness. You might struggle to find the right words, experience severe memory lapses, or feel entirely disconnected from your surroundings.
Practical Management Strategies
Taking control of your energy requires a targeted approach. You cannot simply ignore these symptoms and hope they disappear.
Improve Sleep Hygiene
Quality sleep is your foundation. Go to bed and wake up at the same time every day to regulate your circadian rhythm. Keep your bedroom cool and dark. Stop looking at phone and computer screens at least an hour before sleep, as blue light disrupts your natural melatonin production.
Reduce Daily Stressors
You must actively tell your nervous system that you are safe. Practice deep breathing exercises to lower your heart rate. Set strict boundaries around your work hours and decline optional commitments that drain your energy. Gentle movements, like restorative yoga or slow walking, can help release physical tension without causing an energy crash.
Seek Professional Medical Advice
If your exhaustion lasts for more than a few weeks and interferes with your daily life, it is time to consult a professional. A doctor can run blood tests to rule out thyroid issues, vitamin deficiencies, or other underlying conditions. You might also consider visiting a wellness center that specializes in holistic recovery, as they can provide tailored nutritional support, physical therapy, and stress management coaching.
Conclusion
Ignoring your body’s warning signs will only prolong recovery. Recognizing the difference between a temporary stressful period and chronic fatigue is the first step toward healing. Track your energy levels, prioritize genuine relaxation, and seek professional help if your exhaustion persists. By proactively monitoring your health, you can build a routine that protects your energy long-term.
Pickleball has two distinct formats, singles and doubles, each requiring different strategies. Many players excel in one but struggle in the other, even though court dimensions remain the same. Singles rewards aggressive baseline play and exceptional fitness, while doubles emphasizes teamwork, positioning, and strategic patience.
Key Differences in Gameplay and Strategy
The most obvious difference between singles and doubles lies in court coverage. In singles, you’re responsible for the entire court width of 20 feet, while doubles players each cover roughly 10 feet of width. This fundamental change ripples through every aspect of strategy.
Court Positioning
Singles players typically position themselves closer to the center of the court, ready to move laterally to either side. The baseline becomes your home base, with occasional forward movement to attack short balls. Doubles players start with one person at the baseline and one at the net, working together to advance both players to the non-volley zone (kitchen) line.
Serving Strategy
In singles, the serving strategy focuses on placing opponents in difficult positions across the full width of the court. Deep serves to the corners create maximum movement requirements for your opponent. Doubles serving aims to keep the receiving team back, typically targeting the deep middle or the weaker player’s backhand.
Scoring Implications
Singles games use a two-number scoring system (your score, opponent’s score), while doubles adds a third number indicating which player is serving. This affects game flow and comeback potential. Singles matches often see more dramatic scoring swings because one player controls all points.
Singles Strategies: Court Coverage and Shot Selection
Singles pickleball demands exceptional fitness and court coverage skills. Success requires strategic shot placement combined with the endurance to maintain high-level play throughout longer rallies.
Movement and Positioning
Efficient movement patterns separate good singles players from great ones. After each shot, return to a central position about three feet behind the baseline. This gives you the best opportunity to reach shots hit to either corner. Practice the split-step timing—a small hop as your opponent contacts the ball—to improve reaction time.
Stay light on your feet and avoid getting caught flat-footed. The cross-court recovery step helps maintain balance while moving toward wide shots. When pulled out of position, focus on getting back to center court rather than attempting a risky winner.
Shot Selection Mastery
Depth control becomes critical in singles play. Aim for shots landing within three feet of the baseline to keep opponents pinned back. Short shots invite aggressive attacks and put you on defense immediately.
The cross-court dink strategy works differently in singles than doubles. Use cross-court shots to move opponents laterally, creating openings for down-the-line winners. However, be cautious with cross-court attempts from defensive positions, as they provide your opponent more angle options.
Drop shots become powerful weapons in singles when timed correctly. After establishing a pattern of deep shots, a well-placed drop shot can catch opponents off-guard and create easy putaway opportunities.
Serve and Return Strategy
Develop a consistent deep serve that lands within two feet of the baseline. Focus on placement over power—a serve that consistently reaches the back corners causes more problems than an occasional ace mixed with double faults.
On returns, prioritize depth and aim for the middle of the court. This neutral positioning prevents your opponent from immediately attacking with angled shots while you recover to center court.
Doubles Strategies: Communication and Teamwork
Doubles pickleball transforms individual shot-making into a team sport requiring constant communication and coordinated movement. The strongest doubles teams move as a unit, supporting each other’s positioning and shot selection.
Partner Communication
Establish clear communication patterns before points begin. Call “mine,” “yours,” or “switch” early and loudly enough for your partner to hear over ambient noise. Develop hand signals for serving strategies and positioning adjustments.
The “inside-out” rule helps determine shot responsibility. The player with the ball traveling toward their forehand side typically takes the shot, allowing for stronger returns and better court positioning afterward.
Positioning and Movement
The most successful doubles teams maintain parallel positioning—both players at the same depth on the court. When one player moves forward to attack a short ball, both players advance to the kitchen line together. When forced to retreat by a deep shot, both players move back as a unit.
Master the “shadow” technique where partners mirror each other’s lateral movement. If your partner moves left to cover a wide shot, you should also shift left to maintain proper court coverage and avoid creating a large gap down the middle.
The Third Shot Strategy
The third shot represents the most critical shot in doubles pickleball. After the serve and return (shots one and two), the serving team must execute a shot that allows them to advance to the net. The third shot drop—a soft, arcing shot that lands in the opponent’s kitchen—remains the gold standard.
Practice third shot drives as an alternative when opponents position themselves too far back. A well-placed drive forces quick reactions and can create errors or weak returns for easy putaways.
Advantages and Disadvantages of Each Format
Singles Advantages
Singles players develop superior fitness levels and court coverage skills that translate well to doubles play. You control every decision without needing to coordinate with a partner, allowing for aggressive shot-making and creative strategies.
The format rewards individual improvement directly—your practice time immediately benefits your match performance. Singles also provides excellent training for pressure situations since you handle all crucial points alone.
Singles Disadvantages
The physical demands can be overwhelming, especially for older players or those with mobility limitations. Longer rallies test endurance levels that some players cannot maintain consistently.
Recovery time between points becomes crucial, and players often struggle with the mental pressure of handling every situation independently. The margin for error shrinks since no partner can cover for mistakes.
Doubles Advantages
Doubles allows players of varying fitness levels to compete effectively by sharing court coverage responsibilities. The team aspect creates social connections and shared accountability that many players find motivating.
Strategic complexity increases with teamwork elements, making matches intellectually engaging beyond pure shot-making ability. Players can specialize in specific skills while relying on partners to complement their weaknesses.
Doubles Disadvantages
Communication breakdowns lead to frustrating errors and missed opportunities. Personality conflicts or differing play styles can create tension that affects performance. Players may become overly dependent on partners and struggle to develop complete individual skills.
Training Tips for Both Singles and Doubles
Singles-Specific Training
Cardiovascular fitness training should emphasize interval work that mimics match conditions. Sprint drills combined with recovery periods build the endurance needed for long rallies. Practice court coverage patterns through cone drills that simulate game movements.
Work on shot accuracy through target practice, aiming for specific court areas consistently. Set up targets in the deep corners and practice hitting them from various court positions. Mental toughness training helps handle the pressure of individual responsibility.
Doubles-Specific Training
Communication drills should be incorporated into every practice session. Practice calling shots while moving and under pressure. Work with multiple partners to develop adaptability and communication skills with different playing styles.
Positioning drills that emphasize moving as a unit help develop the instinctive coordination successful doubles teams display. Practice third shot drops and kitchen line exchanges extensively, as these situations determine most doubles points.
Cross-Training Benefits
Playing both formats improves overall pickleball skills significantly. Singles develops the fitness and court coverage that makes doubles positioning more effective. Doubles teaches strategic patience and teamwork that can inform smarter singles shot selection.
Many professional players, including those competing at the world pickleball championship level, excel in both formats by understanding how skills transfer between them. The mental aspects of each format complement each other—singles builds individual confidence while doubles develops strategic thinking.
Conclusion
Choosing between pickleball singles and doubles depends on your goals and preferences. Doubles are beginner-friendly and less physically demanding, while singles offer a tougher challenge requiring more fitness. Playing both enhances overall skills; doubles improves strategy, and singles boost fitness and shot accuracy. This balanced approach leads to a well-rounded game and continued enjoyment.


Is Hizzaboloufazic Good or Bad? Full 2025–2026 Analysis & Safety Review

Sustore: What “Sustore” Means Across E-Commerce, Retail, and IT

Best Pollo Al Chilindrón Near Me (2026): Where to Find This Classic Spanish Chicken Dish
-
 FOOD MARKET1 week ago
Best Pollo Al Chilindrón Near Me (2026): Where to Find This Classic Spanish Chicken Dish
-
 Business1 week ago
Sustore: What “Sustore” Means Across E-Commerce, Retail, and IT
-
 Blog2 days ago
Is Hizzaboloufazic Good or Bad? Full 2025–2026 Analysis & Safety Review
-
 Business1 week ago
How Shared Live Experiences Create Stronger Emotional Connections with Brands