
SPORTS
How to Throw a Curveball A Complete Guide for Beginners and Aspiring Pitchers
Learning how to throw a curveball is one of the most exciting milestones for any baseball pitcher. It’s a pitch that blends finesse, technique, and deception. When executed correctly, a curveball can leave batters frozen or swinging at air. But learning this pitch is no walk in the park—it takes patience, understanding, and a lot of repetition. In this article, we’ll dive deep into the art of throwing a curveball, break down the mechanics step by step, explore common mistakes, and provide tips that can take your pitching to the next level.
Understanding What a Curveball Is
Before you even grip the ball, it’s important to understand exactly what a curveball is and why it’s such a valuable pitch. A curveball is a breaking ball that “curves” as it travels toward home plate. The signature downward and lateral movement is created by imparting topspin on the ball, causing it to dive as it reaches the batter.
This movement is what differentiates a how to throw a curveball curveball from a fastball or a slider. While a fastball relies on speed and minimal movement, a curveball plays tricks on the batter’s perception. It starts out looking like a strike but then drops out of the zone at the last second. Some even call it a “12-6 curve” because of how the ball drops from the top (12 o’clock) to the bottom (6 o’clock) on a clock face.
Understanding this fundamental difference is crucial. You’re not just trying to throw slower or spin the ball for fun—you’re trying to deceive the hitter by changing the ball’s path in mid-air using physics and mechanics.
Step-by-Step Mechanics of Throwing a Curveball
Throwing a curveball isn’t just how to throw a curveball how to hrow a curveball about twisting your wrist or snapping your fingers. It involves precise coordination of your grip, arm action, wrist movement, and follow-through. Let’s break it down step-by-step.
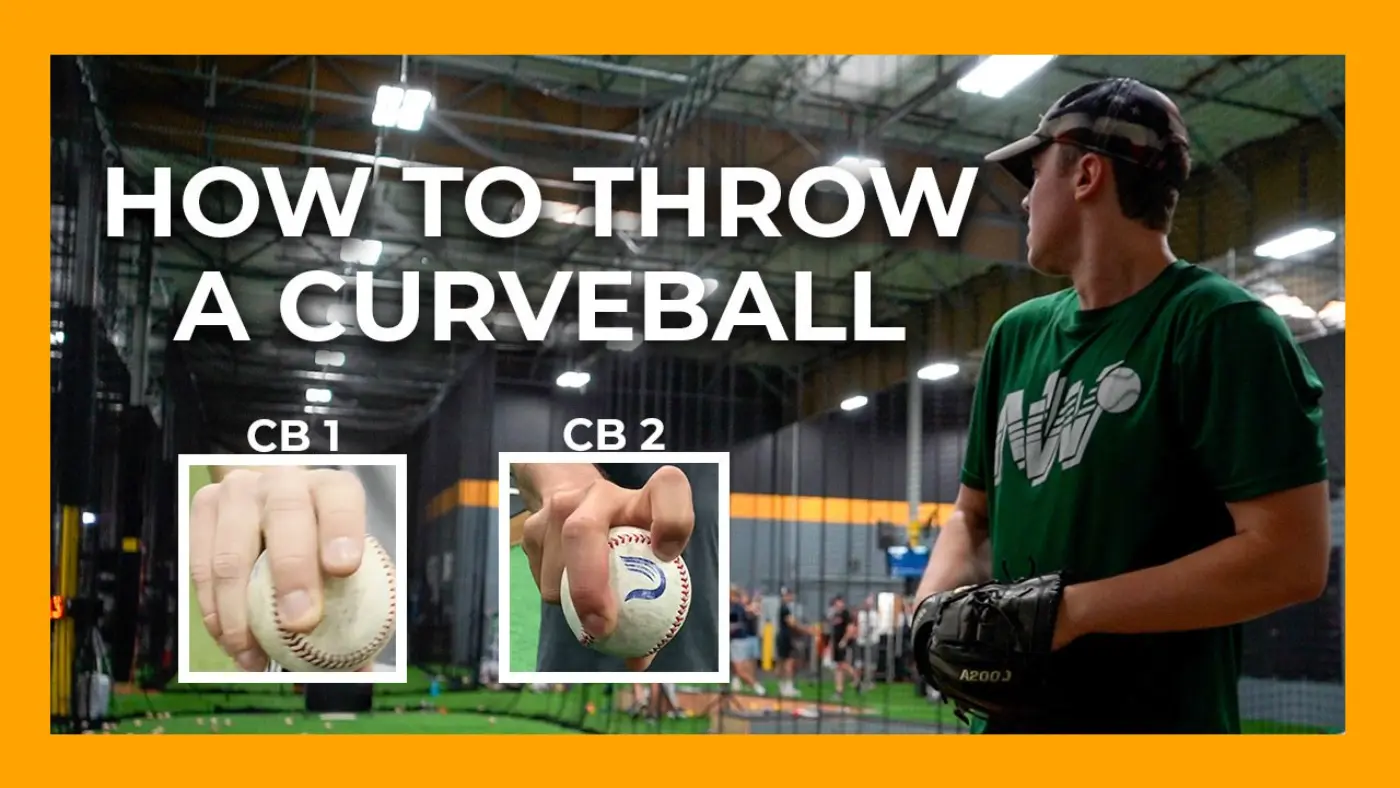
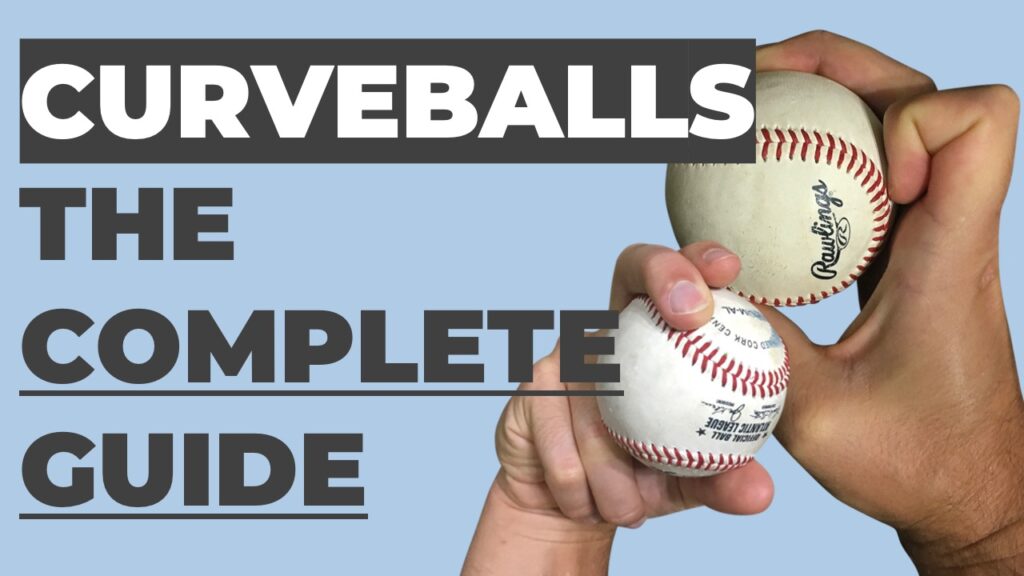
1. The Grip:
Start with a firm grip using your index and middle fingers placed along the seam of the ball in a horseshoe shape. Your thumb should rest underneath the ball for support, touching the leather—not the seam. This grip is crucial for producing the necessary spin.
Your grip should be tight enough to control the ball, but not so tight that it reduces flexibility in your wrist. Think of it like holding a ripe peach—you don’t want to squish it, but you also don’t want to drop it.
2. Arm Motion and Delivery:
The curveball delivery begins just like a fastball. This is to avoid tipping your pitches to the batter. Keep your arm slot consistent with your other pitches, whether you’re over-the-top or three-quarters. Consistency in arm slot is how to throw a curveballkey to deception.
As your arm comes forward, your wrist should begin to rotate inward. This is often referred to as “turning the doorknob” or “pulling down the shade.” The motion helps impart topspin to the ball.
3. The Release and Follow-Through:
At the release point, your wrist should snap down as your fingers roll over the top of the ball. This creates the necessary topspin that makes the curveball drop. The follow-through should bring your throwing arm down and across your body, which helps add control and reduces strain on your arm.
It’s important not to “muscle” the pitch. Let how to throw a curveball the spin and mechanics do the work. Overexerting yourself can lead to injury, especially in your elbow or shoulder.
The Physics Behind the Curve
Many people wonder how the ball actually how to throw a curveball breaks. The answer lies in something called the Magnus effect. When the ball spins forward due to the topspin you apply during release, it creates pressure differences in the air around the ball. This causes the ball to drop and move sideways—creating the “curve.”
The faster and tighter the spin, the sharper the break. That’s why developing a consistent wrist snap and finger roll is so critical to mastering the pitch. If the spin is too slow or wobbly, the ball won’t break much—it’ll just float, making it easy for the batter tohow to throw a curveball hit.
Common Mistakes When Learning the Curveball
Learning how to throw a curveball takes time, and like any skill, it’s easy to fall into some common traps. Here are a few to watch out for:
1. “Snapping” the Elbow or Arm Too Hard:
A lot of young pitchers mistakenly think that how to throw a curveball snapping the elbow or whipping the arm around will create more movement. In reality, this is a fast track to injury. The spin comes from the wrist and fingers—not from forcing the arm to twist unnaturally.
2. Changing Arm Angles:
It’s tempting to drop your arm or change your delivery when throwing a curveball. But any change in motion can tip off the batter and reduce the how to throw a curveball pitch’s effectiveness. Always aim to throw your curveball with the same arm angle and motion as your fastball.
3. Overthinking or Overgripping the Ball:
Sometimes pitchers grip the ball too tightly how to throw a curveball because they’re nervous or unsure. A death grip can kill the ball’s spin and make it harder to control. Trust your grip and stay relaxed.
Curveball Variations: Not All Breaks Are the Same
As you develop your curveball, you’ll notice that different grips and release angles can produce different types of breaks. Here are a few variations to experiment with:
1. 12-6 Curveball:
This is the classic, vertical-breaking curve how to throw a curveball that drops straight down. It’s often thrown with an over-the-top delivery.
2. 11-5 Curveball:
This curve breaks both downward and slightly to the side, like going from 11 o’clock to 5 o’clock on a clock face. It’s more common with how to throw a curveball three-quarter arm angles.
3. Knuckle-Curve:
This is a hybrid pitch where the index finger is tucked under or pressed like a knuckle. It produces a tighter spin and sharper break, though it can be harder to control.
Experimenting with these how to throw a curveball variations can help you find the version that suits your natural mechanics best.
Drills to Improve Your Curveball
Practice makes perfect, and there are a few drills you can do regularly to build a better curveball.
1. Wrist Snap Drill:
Stand a short distance from a wall or net. Focus only on snapping your wrist and spinning the ball with proper form. This helps isolate the wrist movement without worrying about your whole delivery.
2. Flat-Ground Throwing:
Work on your curveball from flat ground at about 60 feet. This allows you to hone your mechanics without putting too much stress on your body.
3. Slow-Motion Repetitions:
Throw your curveball in slow motion, exaggerating each step of the mechanics. This helps you internalize the proper movement and recognize when things go wrong.
When and How to Use the Curveball in Games
A curveball isn’t just about the mechanics—it’s also about strategy. Knowing when to throw it is just as important as knowing how to throw it.
1. Use It as a Strikeout Pitch:
A well-placed curveball is devastating with two strikes. If the batter is expecting a fastball, the sudden drop can result in a swing-and-miss or a frozen look.
2. Change Eye Levels:
Mix in the curveball after a high fastball. This makes the pitch seem like it’s starting high before it suddenly drops out of the zone.
3. Get Ahead in the Count:
Some pitchers like to start with a curveball to catch the hitter off guard. Throwing it for a strike early can make your fastball even more effective later.
Safety Tips and Injury Prevention
Curveballs are notoriously tough on young arms, especially if the pitcher hasn’t developed good mechanics yet. Here are a few important safety tips:
- Don’t throw a curveball too young. Most experts recommend waiting until you’re at least 13–14 years old.
- Always warm up properly. Stretch, throw your fastball first, and ease into your curveball reps.
- Listen to your body. If your elbow or shoulder starts to ache, stop immediately and rest.
- Limit pitch counts. Don’t overuse the curveball. Mix in other pitches and stick to recommended pitch counts based on your age.
Conclusion:
Learning how to throw a curveball is a rewarding journey, but it’s not something that happens overnight. It requires dedication, attention to detail, and respect for the art of pitching. Don’t be discouraged by early failures—every great pitcher once threw a terrible curveball. What separates the good from the great is persistence.
So, get out there, grab a ball, and start snapping that wrist. Your future self on the mound will thank you.

What Is AS Goal and Why Is It Trending?
AS Goal (اس جول) is one of the most searched and widely used free live sports streaming websites among football fans in the Arab world and Pakistan. The platform has gained massive popularity because it offers live match streams, scores, and updates without requiring expensive subscriptions.
The official domain, as-goal.com, along with its mirror links, provides access to “بث مباشر مباريات اليوم” (live matches today) in real time. Fans who cannot access premium services like beIN Sports or DAZN often turn to AS Goal as a convenient alternative.
Its rise in 2026 reflects a growing demand for accessible, real-time football content, especially in regions where official broadcasts are either restricted or costly.
Key Features of AS Goal Website
Live Streaming and Match Coverage
The core feature of AS Goal is its ability to stream live football matches in HD quality. Users can watch games from top leagues such as:
- Premier League
- La Liga
- Serie A
- Bundesliga
- Ligue 1
- Saudi Pro League & Egyptian League
- AFC Champions League
The platform usually provides multiple streaming servers (Server 1, Server 2, etc.), ensuring backup options if one stream fails.
Scores, Stats, and Commentary
Beyond streaming, AS Goal also delivers:
- Live scores and match timelines
- Team lineups and player stats
- Text commentary (Arabic and sometimes English)
This combination makes it a one-stop hub for football fans who want both viewing and real-time analysis.
Why Football Fans Prefer AS Goal
Free Access Without Subscriptions
One of the biggest reasons for AS Goal’s popularity is its completely free access. Unlike official broadcasters, users don’t need to pay monthly fees or create accounts.
For fans in countries where sports subscriptions are expensive, this becomes a highly attractive option. It essentially removes the barrier between fans and their favorite matches.
Daily Match Updates
The site is updated daily with “أهم مباريات اليوم” (today’s top matches), making it easy to find ongoing and upcoming games. This feature saves time and ensures users never miss major fixtures.
Additionally, its growing presence on YouTube (As Goal channel) provides highlights, previews, and discussions, expanding its reach beyond just streaming.
How to Use AS Goal Safely in 2026
Step-by-Step Access Guide
Using AS Goal is simple, but users should follow a few steps for a smoother experience:
- Visit www.as-goal.com or a working mirror link
- Select the match you want to watch
- Choose from available streaming servers
- Start the live stream
Safety Tips for Users
Because the platform relies heavily on ads, it’s important to stay cautious:
- Use a reliable ad blocker (like uBlock Origin)
- Avoid clicking suspicious pop-ups
- Consider using a VPN, especially in regions where the site may be blocked
These steps help reduce risks and improve streaming performance.
Risks and Legal Concerns
Is AS Goal Legal?
A major concern surrounding AS Goal is that it often provides unauthorized (pirated) streams of live matches. This means the platform operates in a legal gray area or outright violates broadcasting rights in many countries.
Users should understand that accessing such streams may breach local laws or regulations, depending on their location.
Common Issues Users Face
Despite its popularity, AS Goal has several downsides:
- Heavy ads and pop-ups, sometimes malicious
- Unstable streaming quality during high-demand matches
- Links that may suddenly stop working
These issues highlight the trade-off between free access and reliability.
Best Alternatives to AS Goal
Legal and Reliable Options
For users who want safer and more stable experiences, there are several alternatives:
| Platform | Type | Key Features |
|---|---|---|
| beIN Connect | Paid | Official HD broadcasts, no ads |
| Shahid | Paid | Middle East sports + entertainment |
| DAZN | Paid | Global sports streaming |
Free Non-Streaming Options
If you only need updates (not live video), consider:
- FlashScore – Fast live scores and stats
- SofaScore – Detailed analytics and player ratings
- Goal.com – News, previews, and live commentary
These platforms are legal, secure, and widely trusted.
Final Thoughts on AS Goal in 2026
AS Goal remains a highly popular football streaming website due to its free access, wide coverage, and real-time updates. It fills a gap for fans who cannot afford or access premium services, making it a go-to platform for millions.
However, users must balance convenience with caution. The presence of ads, potential security risks, and legal concerns means it’s not always the safest option.
For the best experience, combining AS Goal with trusted score apps or official broadcasters can provide both accessibility and reliability.
“Cricfooty” in 2026, you’re not alone. The keyword has exploded across Google US, appearing in autocomplete suggestions, blog posts, and even “People Also Ask” boxes. Dozens of articles claim it’s the ultimate digital hub combining cricket and football (soccer) into one powerful platform.
But here’s the verified reality:
Cricfooty is not a fully launched, major app, website, or registered sports company.
As of March 2026, there is:
-
No functional official platform
-
No verified founders
-
No confirmed launch announcement
-
No coverage from major sports outlets like ESPN, BBC Sport, Cricinfo, The Athletic, or MLSsoccer.com
-
No working product demo
-
No screenshots of a real dashboard
Even cricfooty.com currently shows only a blank server directory index — not a live sports platform.
So why is it suddenly everywhere?
Let’s break down the complete 2026 truth behind Cricfooty — especially for US searchers.
1. What Is Cricfooty? (The Actual Meaning Behind the Name)
The word “Cricfooty” is a simple portmanteau:
-
Cric = Cricket
-
Footy = Football (soccer)
On paper, the concept sounds smart. A unified hub where fans can:
-
Track IPL and Premier League scores
-
Follow T20s and Champions League matches
-
View real-time stats
-
Access AI-powered insights
-
Join community discussions
And that’s exactly how most blog posts describe it.
But here’s the key detail:
There is no verified, functioning platform delivering these features.
Instead, what exists are dozens of nearly identical promotional articles published between October 2025 and February 2026. These articles typically promise:
-
Real-time live scores for cricket + football
-
Match previews and expert analysis
-
Tactical breakdowns
-
Player statistics dashboards
-
Personalized AI recommendations
-
Cross-platform web + mobile experience
-
Free access with optional premium features
Yet none of them:
-
Link to a working app
-
Show proof of a product
-
Cite official company details
-
Provide business registration data
-
Include screenshots
The idea of Cricfooty is appealing. The platform itself? Unverified and currently non-existent in operational form.
2. The Verified Timeline: When Did Cricfooty Actually Appear?
Let’s strip away the hype and focus on what can be confirmed.
October 2025
The first known promotional-style article appears online titled something similar to “The Rise of Cricfooty.”
It describes a revolutionary sports hub combining cricket and football.
January–February 2026
A sudden explosion of near-duplicate articles appears across low-authority domains such as:
-
futuresbytes.co.uk
-
theexpertmagazine.com
-
oreteai.com
-
jezzieg.com
-
adamsbutler.com
-
theplayhouselv.com (now 404)
All follow the same structure:
-
Over-promotional language
-
Generic feature lists
-
No verifiable sources
-
No official press coverage
March 2026
-
cricfooty.com remains non-functional.
-
No official app listing exists in Apple App Store or Google Play.
-
No corporate registration publicly verified in US or UK records.
That’s the honest, documented timeline.
No stealth beta launch.
No press embargo.
No confirmed roadmap.
Just blog hype.
3. Why Is Cricfooty Trending in US Google Searches in 2026?
Now here’s where it gets interesting.
This isn’t random. It’s strategic.
The Growing US Sports Market
In 2026, American interest in:
-
Indian Premier League (IPL)
-
Major League Cricket (MLC)
-
Premier League
-
UEFA Champions League
-
MLS
has grown significantly.
Streaming platforms like:
-
ESPN+
-
Peacock
-
Paramount+
-
Apple TV
have expanded global sports coverage in the US.
AI-driven SEO farms noticed a trend:
US users are increasingly searching for combined cricket + soccer score platforms.
That’s when the term “Cricfooty” began appearing in mass-produced articles.
How Manufactured Search Trends Work
-
Content farms publish keyword-stuffed articles.
-
Google temporarily indexes and ranks fresh content.
-
Search volume increases due to curiosity.
-
Autocomplete suggestions expand.
-
More people search.
-
More articles get created.
It becomes a loop.
This is the 2026 version of manufactured search demand.
Google’s Helpful Content Update and anti-spam systems are already reducing visibility of pure AI fluff — which is why some early Cricfooty articles have disappeared.
4. Is Cricfooty the Same as CricFy TV or CricFoot.net? (Important Distinction)
Many US users are confused by similar names. Let’s clarify clearly.
CricFoot.net
-
A real, functioning website
-
Focused mostly on football goal highlights
-
Occasionally posts cricket clips
-
Does NOT offer full stats hub features
CricFy TV / CRICFy TV APK
-
Separate product entirely
-
Pirate streaming app
-
Frequently removed from Google Play
-
Flagged for copyright violations
-
Risky and unofficial
Cricfooty
-
No confirmed app
-
No legal streaming service
-
No working platform
-
Primarily exists as blog hype
Important:
If you see a download link claiming to be the “Cricfooty App,” avoid it.
There is no verified official release.
5. What US Sports Fans Should Use Instead (2026 Legit Alternatives)
If you’re an American fan wanting cricket + soccer coverage, here are real, trusted platforms:
For Cricket in the US
-
ESPN+ / ESPN App (official IPL and international coverage)
-
Cricbuzz
-
ESPN Cricinfo
-
Major League Cricket official site
-
Willow TV
For Football (Soccer)
-
Peacock (Premier League)
-
Paramount+ (Champions League)
-
Apple TV (MLS)
-
ESPN+ (LaLiga, Bundesliga)
Best Combined Score Tracking
| Platform | Cricket | Football | Real-Time Scores | Free Option |
|---|---|---|---|---|
| Flashscore | ✅ | ✅ | Excellent | ✅ |
| Sofascore | ✅ | ✅ | Excellent | ✅ |
| TheScore | Limited | ✅ | Good | ✅ |
| Yahoo Sports | Limited | ✅ | Good | ✅ |
If you’re simply looking for:
-
Live scores
-
Match alerts
-
Multi-sport tracking
Flashscore and Sofascore are currently the best US-friendly solutions.
6. Will Cricfooty Ever Become a Real Platform? (2026 Outlook)
Here’s the honest answer:
It’s possible — but currently unproven.
The idea makes business sense.
Cricket viewership in the US is rising due to:
-
Major League Cricket expansion
-
South Asian diaspora growth
-
Streaming accessibility
Soccer growth is accelerating because of:
-
2026 FIFA World Cup in North America
-
MLS expansion
-
Premier League dominance
A unified sports hub targeting both audiences could work.
But until there is:
-
A registered company
-
A verified launch
-
Media coverage from trusted outlets
Cricfooty remains concept-level hype, not a live product.
Frequently Asked Questions (US Search Optimized – 2026)
Is Cricfooty a real app or website?
No active, fully functional platform exists as of March 2026.
Why does Cricfooty show up in Google autocomplete?
Because multiple SEO-driven blog articles created artificial search demand.
Is Cricfooty the same as CricFy TV?
No. CricFy TV is a separate pirate streaming APK. Different product entirely.
Is Cricfooty safe to click?
Blog articles are generally harmless but low-quality. Avoid any APK downloads claiming to be a Cricfooty app.
Will Cricfooty launch officially?
There is no confirmed launch date or verified company backing it.
Bottom Line for 2026
Cricfooty is currently an internet marketing phenomenon — not a verified sports platform.
It’s a catchy name combining two of the world’s fastest-growing sports in the US: cricket and football (soccer). AI-driven content farms amplified it to capture sports search traffic.
But as of now:
-
No working site
-
No official app
-
No verified company
-
No major media coverage
For US sports fans, stick with trusted, licensed platforms until a real Cricfooty product — if it ever exists — is officially announced.

Nueraji vs Crosbie Prediction: The welterweight clash between Taiyilake Nueraji and Kiefer Crosbie at UFC Fight Night: Walker vs. Zhang (August 23, 2025 – Shanghai, China) turned into one of the most controversial and talked-about finishes of 2025.
Originally expected to be a showcase for China’s rising prospect, the bout delivered fireworks — and debate — after an illegal knee, a two-point deduction, and a brutal elbow stoppage.
Here’s the full 2026 breakdown for US and global MMA fans.
Quick Result: Who Won Nueraji vs Crosbie?
Taiyilake Nueraji def. Kiefer Crosbie by TKO (elbows) – Round 1, 3:33
Key Moment
-
Nueraji landed an illegal knee to a seated Crosbie.
-
Referee Marc Goddard deducted two points.
-
Fight resumed.
-
Nueraji swarmed with ground-and-pound elbows for the TKO finish.
The result improved Nueraji to 12–1 (3–0 UFC) and instantly placed him on the radar as one of China’s top welterweight prospects.
Fighter Profiles & Tale of the Tape
Taiyilake Nueraji (“Super Saiyan”)
-
Record (post-fight): 12–1–0
-
Age at fight: 24
-
Height/Reach: 6’2″ / 75”
-
Style: Aggressive striker (knees, elbows, pressure)
-
Finishes: 11 KO/TKO wins (92% finish rate)
Nueraji entered the bout as a fast-rising Chinese prospect with serious knockout power and a flashy, high-volume striking style. Fighting in front of 15,000+ fans in Shanghai, he had clear home advantage.
Kiefer Crosbie (“BDK”)
-
Record (post-fight): 10–6–0
-
Age at fight: 35
-
Height/Reach: 6’0″ / ~74”
-
Style: Pressure fighter, durable brawler
-
Strengths: Toughness, experience, takedown defense
Crosbie, representing SBG Dublin (Ireland), came into the fight on a difficult UFC skid. Known for grit and resilience, he needed a statement performance to stay on the roster.
Pre-Fight Prediction & Betting Odds
Official Betting Odds (August 2025)
-
Taiyilake Nueraji -500 (heavy favorite)
-
Kiefer Crosbie +385 (underdog)
Most sportsbooks had Nueraji as a dominant favorite due to:
-
Youth advantage (11 years younger)
-
Higher finishing rate
-
Home crowd boost
-
Crosbie’s recent first-round losses
Expert Prediction Consensus
Over 80% of analysts predicted:
-
Nueraji by Round 1 or Round 2 TKO
Crosbie’s clearest path to victory was:
-
Survive early
-
Extend into later rounds
-
Force a gritty war
However, against an explosive striker in hostile territory, that path was narrow.
Round 1 Recap – What Actually Happened
Fast & Furious Opening
The fight began at a blistering pace:
-
Nueraji pressed forward immediately.
-
Crosbie absorbed heavy shots.
-
A knockdown sent Crosbie to the canvas.
The Illegal Knee Controversy
While Crosbie was seated against the fence, Nueraji threw a clear illegal knee to the head.
Referee Marc Goddard:
-
Stopped the action
-
Deducted two points
-
Allowed the fight to continue after brief recovery
This became the central controversy of the bout.
Many fans argued:
-
Crosbie needed more recovery time.
-
The foul significantly altered the fight.
-
A disqualification could have been justified.
The Finish (3:33, Round 1)
After the restart:
-
Nueraji secured top position.
-
Unleashed a barrage of brutal elbows.
-
Forced the referee stoppage.
Despite the deduction, the dominant ground-and-pound sealed the TKO win.
Fight Stats & Performance Highlights
Significant Strikes
Nueraji landed the majority of meaningful damage — particularly elbows from top control.
Control Time
After the foul sequence, Nueraji dominated positionally.
Finish Rate
The win marked his 12th career stoppage (11th by strikes).
It reinforced his identity as a high-risk, high-reward finisher.
Post-Fight Reactions & Fallout
Crosbie’s Reaction
Crosbie expressed frustration regarding:
-
Limited recovery time
-
Impact of the illegal knee
-
Referee handling
Many analysts debated whether:
-
The fight should have been paused longer
-
The foul altered the competitive balance
Nueraji’s Celebration
Nueraji celebrated passionately in front of his home crowd, embracing the spotlight as China’s newest welterweight contender.
Current Status (March 2026)
Taiyilake Nueraji
-
Record: 12–1
-
UFC: 3–0
-
On a 6-fight win streak
-
Rising within the welterweight division
Expect him to face ranked opposition in his next appearance.
He is widely considered one of:
China’s brightest UFC prospects in 2026.
Kiefer Crosbie
-
UFC record: 0–3 in most recent stint
-
Released in November 2025
-
Currently competing regionally
Crosbie remains respected for toughness but now rebuilds outside the UFC.
Betting Lessons from Nueraji vs Crosbie
This fight became a case study in MMA betting:
1. Heavy Favorites Can Still Create Chaos
Even at -500, drama unfolded due to rule violations.
2. Fouls Can Change Fight Momentum
Illegal strikes, deductions, and referee decisions can dramatically shift outcomes.
3. Home Crowd Energy Matters
Fighting in Shanghai clearly energized Nueraji.
-
Referee tendencies
-
Fighter discipline
-
Emotional fight environments
Why This Fight Still Matters in 2026
The Nueraji vs Crosbie bout remains relevant because:
-
It showcased China’s growing UFC presence.
-
It sparked debate over foul management.
-
It elevated Nueraji’s star power.
-
It ended Crosbie’s UFC run.
For fans searching:
“Nueraji vs Crosbie prediction”
“Nueraji illegal knee”
“Taiyilake Nueraji UFC Shanghai”
This fight is now remembered as a breakout moment wrapped in controversy.
Final Verdict
The pre-fight prediction proved correct — Taiyilake Nueraji’s explosive striking overwhelmed Kiefer Crosbie early.
However, the illegal knee and referee decision ensured this wasn’t just a routine prospect win — it became one of the most debated finishes of UFC 2025.
As of 2026:
-
Nueraji is climbing.
-
Crosbie is rebuilding.
-
The Shanghai opener remains a highlight-reel controversy.
FAQs
Who won Nueraji vs Crosbie?
Taiyilake Nueraji won via Round 1 TKO (3:33).
Was there an illegal knee?
Yes — Nueraji landed a knee to a seated Crosbie and received a two-point deduction.
What were the betting odds?
Nueraji was a heavy -500 favorite; Crosbie was +385.
Is Nueraji ranked now?
As of early 2026, he is climbing toward ranked welterweight contention.


Checklist for Keeping Whitening, Veneers and Natural Teeth in Balance

Is Hizzaboloufazic Good or Bad? Full 2025–2026 Analysis & Safety Review