Short answer: the Ares 4 LP (also called Titan Controls Ares 4) is a four-burner Liquid Propane (LP) CO₂ generator designed for indoor growing spaces. It’s built to produce steady CO₂ enrichment so plants can photosynthesize more efficiently, and it’s one of the more widely sold mid-range CO₂ generators for hobbyist and small commercial growers.
Below you’ll find a full, actionable, SEO-friendly guide (approx. 2,200+ words) with everything a grower, buyer or installer should know: specs, performance, installation tips, safety and maintenance, real pros/cons, and buying options.
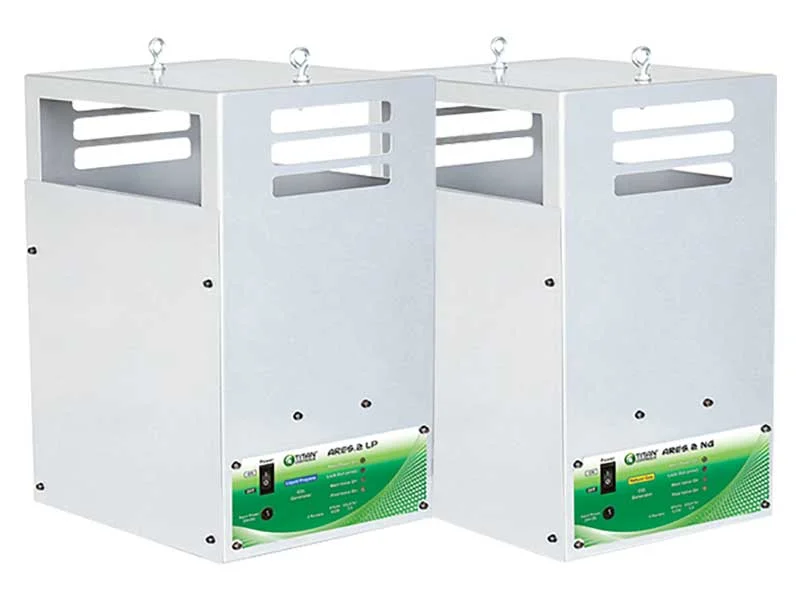
What is the Ares 4 LP and how does it work?
The Ares 4 LP is part of Titan Controls’ Ares® Series of CO₂ generators. It burns a hydrocarbon fuel (in this case liquid propane) in a controlled combustion chamber and converts that fuel into carbon dioxide (CO₂) and water vapor. The CO₂ produced is released directly into the grow space to raise ambient CO₂ levels — typically from ambient (~400 ppm) up to the desired enrichment range (often 900–1,500 ppm depending on grow strategy). The generator contains multiple burners (four burners in this model) to achieve a specific CO₂ production rate.
Key idea: when plants have plenty of light, nutrients and water, boosting CO₂ can increase photosynthesis and growth — the generator is a tool to keep CO₂ levels stable and continuous without the need for CO₂ cylinders or tanks.
Key specifications & performance you must know
Below are the load-bearing technical facts you’ll want front and center when evaluating the Ares 4 LP:
-
Type: Four-burner Liquid Propane (LP) CO₂ generator.
-
CO₂ output / Capacity: Approximately 10.6 cubic feet per hour (cuft/hr) for the LP model (some retailers describe the LP output ~10.6 cuft/hr while NG variants are listed slightly differently). This output is intended for mid-sized grow rooms (common guidance suggests rooms up to ~15′ x 15′ as a general rule of thumb for this capacity).
-
Power: 120 V / 1.5 amps electrical supply required (for the igniter/electronics).
-
Materials & safety features: Powder-coated chassis, brass burners, dual solenoids (redundant gas control in some models), a tip-over safety switch, and included hose & regulator. Many retailers include hanging chain, ceiling hook and the necessary AC power supply in the box.
-
Weight & size: Expect a compact, portable cabinet unit — weight commonly reported around 20–37 lbs depending on configuration and packaging; dimensions vary by vendor but it’s intended to hang or sit on a stable surface.
Why these specs matter: CO₂ output determines how big a space the generator will effectively service. Under-sized units can’t maintain target ppm; oversized units are wasteful and can create safety hazards if not controlled properly.
Installation, setup and operation — step-by-step
Before you buy or light it for the first time, read the manual from the supplier and follow local codes. That said, here’s a practical installer’s rundown:
-
Choose a location. Mount the Ares 4 in an open area inside the grow room — typically hung close to the ceiling or placed on a stable shelf. Exhaust CO₂ is heavier than air when cool, but in a warm grow room it mixes; hanging near the top often helps distribute CO₂ evenly. Many sellers include a hanging chain and ceiling hook.
-
Hook up the fuel source. For LP models, connect a propane tank using the included hose & regulator. For NG (natural gas) versions, connect to a safe natural gas line (only if you have proper plumbing and codes allowing it). Note: there are separate LP and NG models — no changeover kit is needed according to product descriptions.
-
Electrical connection. Plug the unit into a 120 V outlet. The electrical draw is low (~1.5 A) — but do not use damaged cords or insecure extension setups.
-
Controller integration. While the Ares produces CO₂ when it runs, you’ll typically control it with a CO₂ controller (a separate device that measures ppm and switches the generator on/off to hold a setpoint). Some growers pair the Ares with third-party controllers or digital timers — but automatic ppm control is the only reliable way to keep levels safe and stable.
-
Initial test & burn-in. Follow the manual’s ignition and test sequence. Check for gas leaks (soapy water on fittings) before operation. Verify the igniter and burner operation in a well-ventilated area.
-
Monitoring. Always measure ppm in multiple locations in the room (near canopy and near midpoint) and keep an eye on oxygen, temperature, and humidity — CO₂ enrichment can increase growth, but also increases the room’s metabolic demands.
Practical tip: start slowly. Set your controller to a conservative target (e.g., 800–900 ppm), monitor plant response and environmental conditions, and adjust.
Safety, code considerations, and common troubleshooting
Safety first. A CO₂ generator burns fuel and produces heat and water vapor alongside CO₂. That brings risks and regulatory concerns you must manage.
Major safety points:
-
Ventilation & CO₂ monitoring: Use a proper CO₂ controller and monitor — do not rely on timers alone. Elevated CO₂ (above ~5,000 ppm) is dangerous for humans; exposure to >10,000 ppm can be life-threatening. Automatic shutoffs and alarms are strongly recommended.
-
Combustion byproducts: Combustion produces CO₂ and water, but incomplete combustion can produce carbon monoxide (CO). Install units according to manufacturer guidance in areas where CO buildup is prevented; never run a generator in a sealed area without properly sized ventilation/monitoring.
-
Fuel handling: For LP models, follow propane storage & handling rules — secure tanks, keep away from ignition sources not part of the unit, and follow local codes for indoor propane usage. For NG variants, ensure proper gas fitting installed by a licensed technician.
-
Placement & tip-over protection: The Ares has a tip-over switch to shut off gas if it falls — still mount securely.
-
Local codes & insurance: Some municipalities or property leases restrict indoor fuel-burning appliances. Check local fire codes and lease rules, and notify your insurer if you run an indoor grow (non-disclosure can void coverage).
Common troubleshooting & fixes:
-
Unit won’t ignite: Check power to igniter, gas supply and solenoid operation. Ensure the regulator is open and hoses are intact.
-
Uneven CO₂ distribution: Improve air circulation and place CO₂ monitors at canopy height. Use fans to distribute CO₂ but avoid blowers that create excessive local drafts.
-
Smell of gas / suspected leak: Shut off gas immediately, ventilate the area, and check fittings with soapy water. Do not operate until leak is fixed.
(Those safety facts and the unit’s built-in features are documented in retailer product descriptions and specs.)
Maintenance, parts & longevity
Maintaining a CO₂ generator keeps it efficient and safe. Typical maintenance tasks:
-
Regular visual inspection: Look for corrosion on brass burners, deteriorated hoses, frayed wiring, or unusual soot. The Ares uses brass burners to resist rust, but conditions matter
-
Clean burners & orifices: Over time, combustion residues can reduce efficiency. Follow the manual for safe cleaning steps or have a technician service the unit annually.
-
Replace hose & regulator as needed: Many retailers sell replacement hose and regulator kits made for the Ares series — swap every few years or if any wear is visible.
-
Igniter & electronics: Igniters can fail after heavy use; replacements are typically inexpensive and usually available from dealers.
-
Spare parts & service: Because the Ares is widely distributed, parts (regulators, hoses, igniters) are commonly available from hydroponic suppliers and parts vendors. If you buy used, confirm parts availability before purchase.
Lifespan: with proper maintenance, these units can last many years. But wear on ignition parts, hoses and burners is expected; budget for periodic parts.
Pros, cons, and who should buy it
Pros (why growers choose the Ares 4 LP):
-
Cost-effective CO₂ generation for mid-sized rooms compared with cylinder systems (over time).
-
Plug-and-play style — includes many accessories (hose, regulator, chain, hook, AC supply).
-
Durable components (powder-coated chassis, brass burners) and safety features like tip-over switches.
-
Readily available from many hydroponic retailers and marketplaces.
Cons & caveats:
-
Combustion-based CO₂ requires fuel and creates heat & humidity, which may complicate climate control vs. tank CO₂ or sublimation systems.
-
Safety & regulatory compliance: indoor fuel burning sometimes has legal or lease restrictions; you must manage carbon monoxide risk and gas handling.
-
Best for growers who have good ventilation and automated control — novices without proper CO₂ monitoring or controllers shouldn’t run generator systems unsupervised.
Who should buy it: semi-serious hobbyists, small commercial growers, or anyone with a grow room roughly up to mid-sized dimensions who wants continuous CO₂ enrichment and who can meet safety/ventilation requirements.
Buying guide, price expectations and alternatives
Where to buy: the Ares 4 appears widely in hydroponics retailers, big-box online marketplaces and reseller sites (HydroBuilder, GrowItDepot, Lowes listings, Amazon, eBay and specialty stores). Because it’s widely distributed, comparing vendors for price, shipping and warranty makes sense.
Price range: historically, the Ares 4 LP lists in the low-to-mid hundreds USD from hydroponic retailers (prices fluctuate with stock and vendor). For example, some listings showed prices in the ~$330–$390 range depending on variant and retailer; used units often appear cheaper on auction platforms. Prices vary over time and by region — check current vendor listings.
What to look for when buying:
-
LP vs NG version: Buy the correct fuel type for your site. Do not convert a unit yourself.
-
Included accessories: confirm the unit includes the hose, regulator, hanging chain and power supply — some sellers may sell parts separately.
-
Warranty & support: check the retailer/manufacturer warranty and parts availability in your country.
-
New vs used: buying used can save money but inspect for burner condition, soot, hose age and ignition reliability. Ask for test-running videos or return policies.
Alternatives to consider:
-
CO₂ cylinders with a regulator and solenoid: cleaner (no combustion), good control and don’t add heat, but require cylinder swaps and sometimes higher recurring cost depending on consumption.
-
CO₂ generators using natural gas (NG): if you have a safe natural gas hookup, NG versions of the Ares exist and can be cheaper to run per hour in some regions.
-
Electronic CO₂ generators / sublimators or dry ice: less common for steady state enrichment; sublimation devices exist but each system has trade-offs in cost, ease and safety.
Final checklist — is the Ares 4 LP right for you?
Use this quick checklist to decide:
-
Do you run a mid-sized indoor grow (roughly up to ~15′ x 15′)? ✔️ (Ares 4 capacity fits this range).
-
Can you provide safe fuel handling (LP tanks or professional NG hookup) and follow local codes? ✔️
-
Will you use a CO₂ controller and monitor to automate ppm and prevent dangerous exposure? ✔️ (required).
-
Are you prepared to manage additional heat and humidity from combustion in your environment? ✔️
-
Do you want a widely available, economical generator with replaceable parts? ✔️ (the Ares series is well distributed).
If you answered yes to most of these, the Ares 4 LP is a practical, widely used option that balances performance, cost and parts availability.