Painting metallic surfaces is both an art and a science. Whether you are refreshing metallic furniture, upgrading automotive parts, or experimenting with DIY metallic finishes, getting that sleek, long-lasting shine requires more than just a coat of paint. Proper preparation, the right primer, and smart painting techniques all play a role in making your project stand out.
In this guide, we’ll cover everything you need to know about painting metallic surfaces, from preparation to long-term maintenance.
1. What Does Painting Metallic Really Mean?
When people talk about painting metallic, they might mean two different things:
- Painting onto metallic surfaces such as aluminum, steel, or wrought iron.
- Using metallic paints that contain reflective pigments (like aluminum or mica) to give a shiny, metal-like finish.
Both approaches require unique techniques. Painting onto actual metal focuses on adhesion and rust protection, while metallic paints are about achieving smooth coverage and a reflective, shimmering look.
- Automotive industry: Metallic paints give cars a premium, reflective finish.
- Home décor: Metallic spray paints can transform old items into modern, stylish pieces.
- Industrial uses: Painting metallic surfaces protects them from corrosion, moisture, and wear.
Whether you’re coating bare steel or creating a gold-toned accent piece, painting metallic is about balancing beauty and durability.
2. Preparing for Painting Metallic Surfaces
The foundation of any successful painting metallic project is preparation. Metal surfaces don’t hold paint well if they’re dirty, glossy, or rusty.
Key Preparation Steps
- Rust removal: Use a wire brush, sandpaper, or rust remover to clear away corrosion. Rust left untreated will eventually bubble through the new paint.
- Degreasing: Oils and dust prevent paint adhesion. Clean with acetone, mineral spirits, or a degreaser.
- Sanding & scuffing: Smooth metals like aluminum and stainless steel need sanding or scuffing to give the primer a surface to grip.
- Masking areas: Use painter’s tape to protect parts you don’t want coated.
Skipping these steps almost guarantees that your painting metallic finish will peel, chip, or rust prematurely.
3. Choosing the Best Primer and Paint for Painting Metallic
When it comes to painting metallic, the products you choose make or break the finish. Not all paints stick to metal, and not all primers protect against rust.
Primers for Metallic Surfaces
- Rust-inhibiting primers for ferrous metals (steel, iron).
- Self-etching primers for bare, smooth metals like aluminum.
- Specialty primers for galvanized or coated metals.
Paint Options for Metallic Projects
- Metallic spray paints: Easy to apply, give reflective finishes for DIY décor.
- Automotive metallic paints: Premium quality with fine metallic flakes for high-gloss cars and bikes.
- Oil-based enamels: Excellent durability for outdoor metal furniture and railings.
- Water-based acrylics: Eco-friendly, fast drying, suitable for indoor metallic projects.
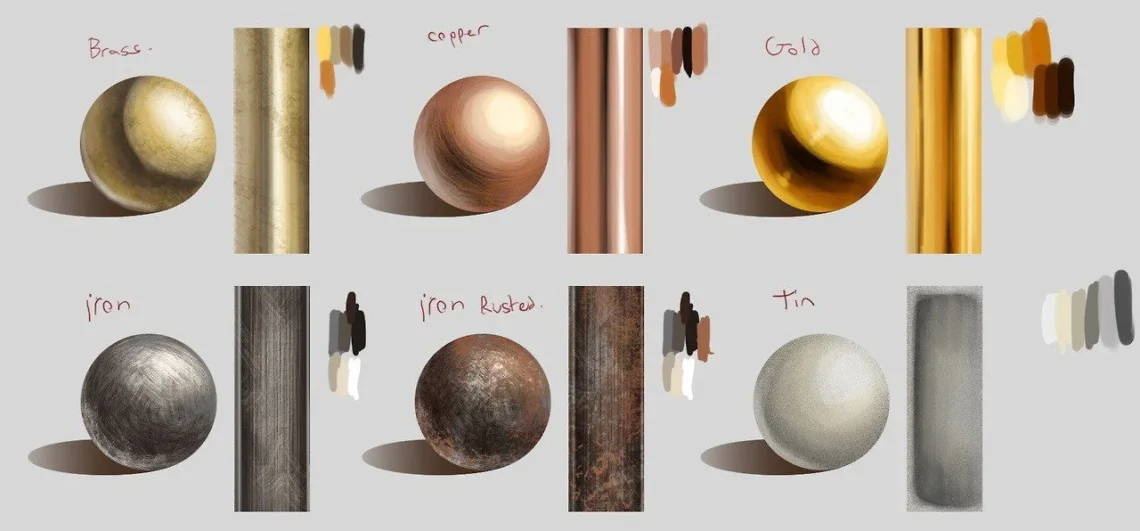
If you’re after a true metallic look, select a metallic paint that matches your desired finish (gold, silver, bronze, copper). Pair it with a clear topcoat for maximum durability.
4. Techniques for a Perfect Metallic Finish
Getting a professional-looking result with painting metallic depends on your technique.
Step-by-Step Process
- Prime the surface: Apply thin, even coats of primer and let each coat dry completely.
- Sand lightly between coats: This smooths imperfections and improves adhesion.
- Apply metallic paint in thin layers: Metallic pigments can settle unevenly, so light coats prevent blotching.
- Use sweeping motions: When spray painting, keep the can 6–12 inches away and move side to side.
- Build up layers: Usually 2–3 coats are needed for an even metallic sheen.
- Seal with clear coat: A protective sealer locks in the shine, prevents chipping, and enhances gloss.
For flat surfaces like gates or panels, brushing and rolling works well. For complex shapes—chairs, automotive rims, decorative pieces—spray painting metallic gives a smoother result.
5. Common Mistakes in Painting Metallic & How to Avoid Them
Even experienced DIYers run into issues when painting metallic surfaces. Here are frequent mistakes and fixes:
- Skipping primer → Paint peels within weeks. Always use primer suitable for metal.
- Applying too much paint at once → Leads to drips and uneven shine. Instead, apply multiple thin coats.
- Not sanding between coats → Causes rough texture or poor adhesion. A quick scuffing makes a huge difference.
- Ignoring curing times → Touching or using the item too soon leads to fingerprints, scratches, or dullness. Let paint fully cure.
- Uneven metallic distribution → Metallic pigments can streak. Shake spray cans often or stir paint thoroughly.
Avoiding these pitfalls ensures your painting metallic project has a smooth, professional finish that lasts.
6. Maintaining Your Painted Metallic Finish
The job isn’t over once the paint dries. Proper care extends the life of your metallic finish.
- Clean regularly: Wipe down with mild soap and water. Avoid harsh abrasives that scratch metallic paint.
- Touch up chips: If you see small scratches or rust spots, sand lightly and reapply primer and metallic paint immediately.
- Protect from moisture: Outdoor metallic projects benefit from clear coats that block water and UV rays.
- Avoid impacts: Metallic paints can chip if struck; be careful with tools, furniture, or moving parts.
- Recoat when needed: Over time, even the best metallic finishes fade. A light sanding and new clear coat can refresh the shine.
With the right maintenance, your painting metallic projects will look brand-new for years.
Conclusion
Painting metallic is more than just applying paint—it’s about careful preparation, the right materials, and skillful application. Whether you’re protecting outdoor metal furniture, giving a car a stunning shimmer, or updating home décor with metallic accents, the steps you follow determine how long your finish lasts.
By understanding metal types, using the proper primer, applying thin and even coats, and protecting the finish with a clear sealant, you can achieve a flawless, durable metallic look. Done right, painting metallic combines strength and beauty, turning ordinary surfaces into striking, long-lasting masterpieces.