Wiring a 3-way switch can seem daunting to homeowners and DIYers, especially because it involves controlling a single light (or group of lights) from two different locations. But with the right understanding of how common, travelers, and switch wiring paths work together, it becomes manageable. In this guide, you’ll learn what a 3-way switch is, how it differs from a regular switch, the standard wiring configurations, step-by-step wiring methods, troubleshooting tips, and safety considerations.
What Is a 3-Way Switch & Why Use It?
A 3-way switch (in U.S. wiring terminology) is a switch that allows control of a lighting circuit from two separate switch locations. Think about stairwells, long hallways, or large rooms with entrances at either end—being able to turn the light on or off from either point improves convenience considerably. Unlike a standard single-pole switch that simply interrupts or connects the hot line, a 3-way switch uses three terminals (plus ground): one common terminal and two traveler terminals. It doesn’t have an on/off marking because its function depends on the position of its mate switch.
An article at The Spruce explains that a 3-way switch always comes in pairs, and the key is to identify the common screw and correctly connect the traveler wires between the switches.
In electronics terminology, a 3-way switch is effectively a single pole, double throw (SPDT) switch. In multiway switching circuits (3-way, 4-way), combinations of these switches allow control from multiple points.
So, when you’re wiring a 3-way circuit, your task is to route power (the “hot”) through one switch, carry travelers between the switches, and then deliver the switched feed to the light fixture, all while maintaining a neutral return to the fixture.
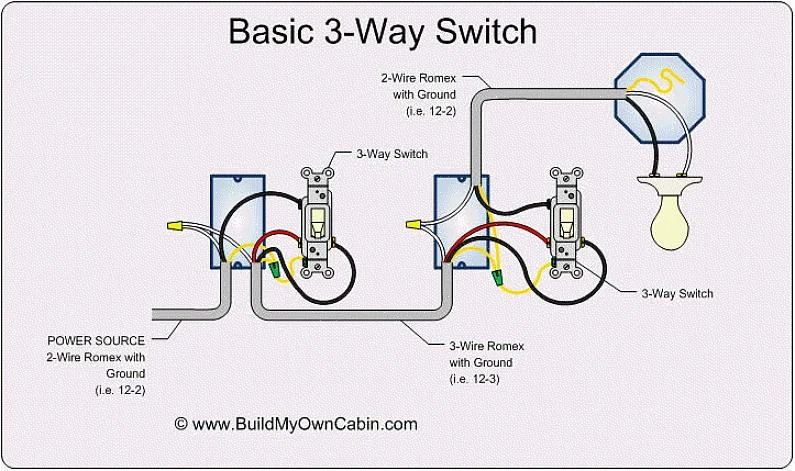
Standard Wiring Configurations & Cable Runs
There are a few common ways a 3-way switch circuit can be wired, depending on where your power source, lighting fixture, and switches are located relative to each other:
-
Power → Switch 1 → Switch 2 → Light
-
Power → Light → Switches (loop through)
-
Power → Switch → Light → Second Switch
In each layout, you will use a 3-conductor cable (often black, red, white + ground) between the two switches. The black and red wires serve as the travelers, and white may function as neutral or repurposed hot (if so, it must be marked). The common terminal on each 3-way switch will connect either to the line (hot feed) or to the switched output going toward the light. Ground wires are tied together at each box and connected to the switches’ ground terminal.
In more complex installations, you may also interpose 4-way (intermediate) switches when you want to control the same light from three or more locations. The 4-way switches are wired between the pair of 3-way switches and swap or pass through the traveler lines.
One key principle to remember: the neutral line generally bypasses the switches and connects directly to the light fixture. The switches themselves only break or redirect the hot (live) conductors.
Step-by-Step Wiring Method
While local electrical codes and practices vary, here is a practical approach to wiring a 3-way circuit in a standard U.S. residential environment. Always turn off power at the breaker before working.
1. Plan and identify cable runs
Decide which switch box gets the line (hot feed) and which goes to the fixture (load). Run a 3-wire cable (black/red/white + ground) between the two switch boxes. Also run the feed or load cable to the appropriate box.
2. At Switch Box 1 (hot feed side)
Connect the hot (line) “hot” conductor (usually black) to the common screw of the first 3-way switch. Then connect the two traveler wires (black and red) to the two traveler screws on that switch (order among the two traveler screws doesn’t matter). Tie ground to the switch’s ground terminal and bond any bare grounds in the box.
3. At Switch Box 2 (switch to fixture side)
Connect the switched hot conductor that goes to the fixture to the common terminal on the second 3-way switch. Then connect the same two traveler wires (black, red) from Box 1 to the two traveler screws on this switch. Also connect ground wires.
4. Light fixture connections
In the location of the light fixture, connect the switched hot coming from the switch box to the hot side of the fixture, and connect the neutral (white) to the fixture’s neutral side. Tie grounds together. If the fixture box also shares other circuits, combine neutrals and grounds in appropriate connectors.
5. Check wiring integrity and label neutrals
If you’ve repurposed a white conductor as a hot or traveler, mark it with black or red tape to indicate it’s not a neutral. Ensure all connections are solid, box fill rules are respected, and nothing is left loose.
Once wiring is complete, restore power and test the switches. Operation should be: toggling either switch is able to turn the light on or off in any combination.
There are optional variations and rerouting possibilities (for example putting the fixture between switches), but this core method applies broadly.
Troubleshooting & Common Mistakes
Even a well-wired 3-way circuit can misbehave if something is off. Here are common issues and how to diagnose:
-
Light only works from one switch: This usually means that the common terminal is wired incorrectly on one of the switches — perhaps the hot or load is mistakenly connected to a traveler screw. Always label and double-check your common connections.
-
No power, or circuit breaker trips: A reversed neutral or short between hot and neutral/traveler can cause faults. Verify that no neutral is switched, and all conductors are isolated properly.
-
Switches feel backwards: Because 3-way toggles have no ON/OFF markings, one switch may act “reversed” in direction relative to the other. This is normal — the arrangement of travelers can make flipping direction seem inconsistent.
-
Buzzing or flicker: Loose connections, shared neutrals not properly joined, or overloaded circuits can cause flicker and hum. Tighten all screws, ensure proper gauge wiring, and avoid sharing loads in odd configurations.
-
Misidentified neutral: If a white wire is used as a hot/traveler but not marked, it can cause confusion. Always tape or mark non-neutral white wires as hot.
-
Box overcrowding & code violations: Ensure that box fill (number of conductors) is not exceeded. Each conductor counts for fill, including grounds and switch devices.
Using a multimeter or voltage tester is essential. Test for continuity on traveler wires, confirm voltage at the common terminals, and verify the load path. Often, isolating the problem comes down to “which switch has the hot or load on wrong screw?”
Safety & Code Considerations
Working on household wiring demands strict adherence to safety and electrical codes (e.g. NEC in U.S., local building codes elsewhere). Before starting:
-
Always shut off power at the breaker, and use a non-contact voltage tester to confirm circuits are dead.
-
Ensure grounding/earthing is properly connected. Each switch box and device must be grounded.
-
Wires must be of appropriate gauge for the circuit (e.g. 14 AWG for 15 A, 12 AWG for 20 A).
-
Box fill rules: each conductor and device counts toward permissible box capacity. Overcrowded boxes are fire risks.
-
Connections and splices must be enclosed in junction boxes with cover plates.
-
All switches and devices must be UL/approved for the circuit’s rating.
-
If installing in jurisdictions with stricter rules (e.g. requiring neutrals in switch boxes for smart switches), you may need to run additional conductors.
-
Label circuits clearly at the breaker panel and inside switch boxes.
When in doubt, hire a licensed electrician. A miswired 3-way circuit can lead to dangerous live wires, backfeeds, or damage to fixtures.
Tips for Easier Installation & Best Practices
Here are some practical tips often used by professionals to make 3-way wiring smoother:
-
Plan before wiring: Sketch the routing of all wires, identify where power, fixture, and switches will be located, and determine which box will be the feed and which the load box.
-
Use extra slack: Leave a few inches extra wire (6–8″) in boxes so you can comfortably connect and rework if needed.
-
Color code travelers: Use consistent colors (e.g. red/black) and mark each end, so you don’t lose track across boxes.
-
Use proper connectors: Use wire nuts rated for the wire types and number of conductors.
-
Mark re-purposed wires: If you convert a white conductor into a hot or traveler, wrap black or red tape to indicate its new role.
-
Make clean splices: When extending cables, use proper connectors in junction boxes, avoid tight loops or kinked wires.
-
Test as you go: After wiring one switch box, before closing up, test connections. A mistake isolated early is easier to fix than after walls are closed.
-
Document wiring: Take photos, label cables and note terminal connections. This helps in future repairs or upgrades.
Conclusion
Wiring a 3-way switch system may look complex on the surface, but it all comes down to understanding the roles of the common terminal, the traveler wires, and how power and load are routed. Whether your circuit is power → switch → switch → light or power → light → switches, the fundamentals remain the same: one conductor is always the constant hot or switched hot, two conductors shuttle between switches, and the neutral remains bypassed.
By following a careful step-by-step method, labeling wires, respecting electrical codes, and testing thoroughly, you can successfully implement a robust and reliable 3-way lighting circuit. Always keep safety at the forefront—if any step feels uncertain, consult or hire a licensed electrician.