
Technology
Ares 4 LP — The Complete Guide to Titan Controls’ Four-Burner CO₂ Generator
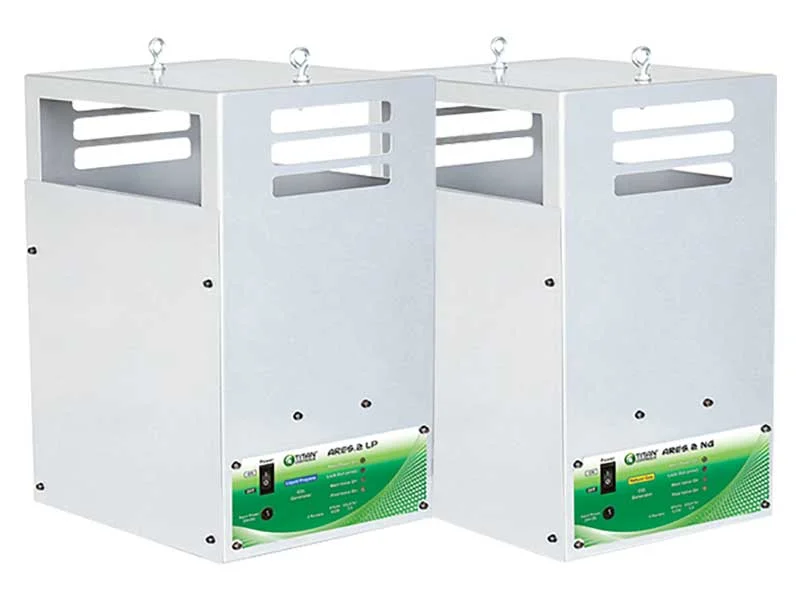
Short answer: the Ares 4 LP (also called Titan Controls Ares 4) is a four-burner Liquid Propane (LP) CO₂ generator designed for indoor growing spaces. It’s built to produce steady CO₂ enrichment so plants can photosynthesize more efficiently, and it’s one of the more widely sold mid-range CO₂ generators for hobbyist and small commercial growers.
Below you’ll find a full, actionable, SEO-friendly guide (approx. 2,200+ words) with everything a grower, buyer or installer should know: specs, performance, installation tips, safety and maintenance, real pros/cons, and buying options.
What is the Ares 4 LP and how does it work?
The Ares 4 LP is part of Titan Controls’ Ares® Series of CO₂ generators. It burns a hydrocarbon fuel (in this case liquid propane) in a controlled combustion chamber and converts that fuel into carbon dioxide (CO₂) and water vapor. The CO₂ produced is released directly into the grow space to raise ambient CO₂ levels — typically from ambient (~400 ppm) up to the desired enrichment range (often 900–1,500 ppm depending on grow strategy). The generator contains multiple burners (four burners in this model) to achieve a specific CO₂ production rate.
Key idea: when plants have plenty of light, nutrients and water, boosting CO₂ can increase photosynthesis and growth — the generator is a tool to keep CO₂ levels stable and continuous without the need for CO₂ cylinders or tanks.
Key specifications & performance you must know
Below are the load-bearing technical facts you’ll want front and center when evaluating the Ares 4 LP:
-
Type: Four-burner Liquid Propane (LP) CO₂ generator.
-
CO₂ output / Capacity: Approximately 10.6 cubic feet per hour (cuft/hr) for the LP model (some retailers describe the LP output ~10.6 cuft/hr while NG variants are listed slightly differently). This output is intended for mid-sized grow rooms (common guidance suggests rooms up to ~15′ x 15′ as a general rule of thumb for this capacity).
-
Power: 120 V / 1.5 amps electrical supply required (for the igniter/electronics).
-
Materials & safety features: Powder-coated chassis, brass burners, dual solenoids (redundant gas control in some models), a tip-over safety switch, and included hose & regulator. Many retailers include hanging chain, ceiling hook and the necessary AC power supply in the box.
-
Weight & size: Expect a compact, portable cabinet unit — weight commonly reported around 20–37 lbs depending on configuration and packaging; dimensions vary by vendor but it’s intended to hang or sit on a stable surface.
Why these specs matter: CO₂ output determines how big a space the generator will effectively service. Under-sized units can’t maintain target ppm; oversized units are wasteful and can create safety hazards if not controlled properly.
Installation, setup and operation — step-by-step
Before you buy or light it for the first time, read the manual from the supplier and follow local codes. That said, here’s a practical installer’s rundown:
-
Choose a location. Mount the Ares 4 in an open area inside the grow room — typically hung close to the ceiling or placed on a stable shelf. Exhaust CO₂ is heavier than air when cool, but in a warm grow room it mixes; hanging near the top often helps distribute CO₂ evenly. Many sellers include a hanging chain and ceiling hook.
-
Hook up the fuel source. For LP models, connect a propane tank using the included hose & regulator. For NG (natural gas) versions, connect to a safe natural gas line (only if you have proper plumbing and codes allowing it). Note: there are separate LP and NG models — no changeover kit is needed according to product descriptions.
-
Electrical connection. Plug the unit into a 120 V outlet. The electrical draw is low (~1.5 A) — but do not use damaged cords or insecure extension setups.
-
Controller integration. While the Ares produces CO₂ when it runs, you’ll typically control it with a CO₂ controller (a separate device that measures ppm and switches the generator on/off to hold a setpoint). Some growers pair the Ares with third-party controllers or digital timers — but automatic ppm control is the only reliable way to keep levels safe and stable.
-
Initial test & burn-in. Follow the manual’s ignition and test sequence. Check for gas leaks (soapy water on fittings) before operation. Verify the igniter and burner operation in a well-ventilated area.
-
Monitoring. Always measure ppm in multiple locations in the room (near canopy and near midpoint) and keep an eye on oxygen, temperature, and humidity — CO₂ enrichment can increase growth, but also increases the room’s metabolic demands.
Practical tip: start slowly. Set your controller to a conservative target (e.g., 800–900 ppm), monitor plant response and environmental conditions, and adjust.
Safety, code considerations, and common troubleshooting
Safety first. A CO₂ generator burns fuel and produces heat and water vapor alongside CO₂. That brings risks and regulatory concerns you must manage.
Major safety points:
-
Ventilation & CO₂ monitoring: Use a proper CO₂ controller and monitor — do not rely on timers alone. Elevated CO₂ (above ~5,000 ppm) is dangerous for humans; exposure to >10,000 ppm can be life-threatening. Automatic shutoffs and alarms are strongly recommended.
-
Combustion byproducts: Combustion produces CO₂ and water, but incomplete combustion can produce carbon monoxide (CO). Install units according to manufacturer guidance in areas where CO buildup is prevented; never run a generator in a sealed area without properly sized ventilation/monitoring.
-
Fuel handling: For LP models, follow propane storage & handling rules — secure tanks, keep away from ignition sources not part of the unit, and follow local codes for indoor propane usage. For NG variants, ensure proper gas fitting installed by a licensed technician.
-
Placement & tip-over protection: The Ares has a tip-over switch to shut off gas if it falls — still mount securely.
-
Local codes & insurance: Some municipalities or property leases restrict indoor fuel-burning appliances. Check local fire codes and lease rules, and notify your insurer if you run an indoor grow (non-disclosure can void coverage).
Common troubleshooting & fixes:
-
Unit won’t ignite: Check power to igniter, gas supply and solenoid operation. Ensure the regulator is open and hoses are intact.
-
Uneven CO₂ distribution: Improve air circulation and place CO₂ monitors at canopy height. Use fans to distribute CO₂ but avoid blowers that create excessive local drafts.
-
Smell of gas / suspected leak: Shut off gas immediately, ventilate the area, and check fittings with soapy water. Do not operate until leak is fixed.
(Those safety facts and the unit’s built-in features are documented in retailer product descriptions and specs.)
Maintenance, parts & longevity
Maintaining a CO₂ generator keeps it efficient and safe. Typical maintenance tasks:
-
Regular visual inspection: Look for corrosion on brass burners, deteriorated hoses, frayed wiring, or unusual soot. The Ares uses brass burners to resist rust, but conditions matter
-
Clean burners & orifices: Over time, combustion residues can reduce efficiency. Follow the manual for safe cleaning steps or have a technician service the unit annually.
-
Replace hose & regulator as needed: Many retailers sell replacement hose and regulator kits made for the Ares series — swap every few years or if any wear is visible.
-
Igniter & electronics: Igniters can fail after heavy use; replacements are typically inexpensive and usually available from dealers.
-
Spare parts & service: Because the Ares is widely distributed, parts (regulators, hoses, igniters) are commonly available from hydroponic suppliers and parts vendors. If you buy used, confirm parts availability before purchase.
Lifespan: with proper maintenance, these units can last many years. But wear on ignition parts, hoses and burners is expected; budget for periodic parts.
Pros, cons, and who should buy it
Pros (why growers choose the Ares 4 LP):
-
Cost-effective CO₂ generation for mid-sized rooms compared with cylinder systems (over time).
-
Plug-and-play style — includes many accessories (hose, regulator, chain, hook, AC supply).
-
Durable components (powder-coated chassis, brass burners) and safety features like tip-over switches.
-
Readily available from many hydroponic retailers and marketplaces.
Cons & caveats:
-
Combustion-based CO₂ requires fuel and creates heat & humidity, which may complicate climate control vs. tank CO₂ or sublimation systems.
-
Safety & regulatory compliance: indoor fuel burning sometimes has legal or lease restrictions; you must manage carbon monoxide risk and gas handling.
-
Best for growers who have good ventilation and automated control — novices without proper CO₂ monitoring or controllers shouldn’t run generator systems unsupervised.
Who should buy it: semi-serious hobbyists, small commercial growers, or anyone with a grow room roughly up to mid-sized dimensions who wants continuous CO₂ enrichment and who can meet safety/ventilation requirements.
Buying guide, price expectations and alternatives
Where to buy: the Ares 4 appears widely in hydroponics retailers, big-box online marketplaces and reseller sites (HydroBuilder, GrowItDepot, Lowes listings, Amazon, eBay and specialty stores). Because it’s widely distributed, comparing vendors for price, shipping and warranty makes sense.
Price range: historically, the Ares 4 LP lists in the low-to-mid hundreds USD from hydroponic retailers (prices fluctuate with stock and vendor). For example, some listings showed prices in the ~$330–$390 range depending on variant and retailer; used units often appear cheaper on auction platforms. Prices vary over time and by region — check current vendor listings.
What to look for when buying:
-
LP vs NG version: Buy the correct fuel type for your site. Do not convert a unit yourself.
-
Included accessories: confirm the unit includes the hose, regulator, hanging chain and power supply — some sellers may sell parts separately.
-
Warranty & support: check the retailer/manufacturer warranty and parts availability in your country.
-
New vs used: buying used can save money but inspect for burner condition, soot, hose age and ignition reliability. Ask for test-running videos or return policies.
Alternatives to consider:
-
CO₂ cylinders with a regulator and solenoid: cleaner (no combustion), good control and don’t add heat, but require cylinder swaps and sometimes higher recurring cost depending on consumption.
-
CO₂ generators using natural gas (NG): if you have a safe natural gas hookup, NG versions of the Ares exist and can be cheaper to run per hour in some regions.
-
Electronic CO₂ generators / sublimators or dry ice: less common for steady state enrichment; sublimation devices exist but each system has trade-offs in cost, ease and safety.
Final checklist — is the Ares 4 LP right for you?
Use this quick checklist to decide:
-
Do you run a mid-sized indoor grow (roughly up to ~15′ x 15′)? ✔️ (Ares 4 capacity fits this range).
-
Can you provide safe fuel handling (LP tanks or professional NG hookup) and follow local codes? ✔️
-
Will you use a CO₂ controller and monitor to automate ppm and prevent dangerous exposure? ✔️ (required).
-
Are you prepared to manage additional heat and humidity from combustion in your environment? ✔️
-
Do you want a widely available, economical generator with replaceable parts? ✔️ (the Ares series is well distributed).
If you answered yes to most of these, the Ares 4 LP is a practical, widely used option that balances performance, cost and parts availability.
Technology
How Container Tracking Platforms Help Logistics Teams Save Time, Reduce Delays, and Improve Supply Chain Visibility
Global supply chains have become increasingly complex over the past few years. Events such as disruptions in the Red Sea, geopolitical tensions affecting the Strait of Hormuz, port congestion, labor shortages, and shifting trade routes have made international transportation less predictable than ever before.
At the same time, customer expectations have changed. Businesses no longer accept waiting days for shipment updates, and customers expect accurate delivery information throughout the transportation process. Whether a company is importing raw materials, exporting finished products, or coordinating inventory across multiple countries, shipment visibility has become a critical operational requirement.
The challenge is that modern supply chains involve multiple stakeholders. A single shipment may pass through several ports, ocean carriers, terminals, customs authorities, warehouses, and trucking providers before reaching its destination. Monitoring every stage manually can quickly become overwhelming.
As a result, logistics teams increasingly rely on digital visibility platforms that provide real-time shipment information from multiple sources. These technologies help businesses track cargo movements, identify potential delays earlier, automate routine monitoring tasks, and improve decision-making across the supply chain.
What Is Container Tracking?
Container tracking is the process of monitoring the location and status of cargo as it moves through global transportation networks.
Traditionally, shipments were tracked using information provided directly by transportation companies. Today, modern tracking platforms allow users to monitor shipments using a container number, booking number, or bill of lading (a shipping document used to identify cargo).
Tracking information can cover every stage of transportation, including:
- Departure from origin ports
- Vessel movements across oceans
- Transshipment operations
- Terminal handling activities
- Customs clearance milestones
- Inland transportation updates
- Final delivery status
Modern tracking platforms provide far more than simple location data. Advanced systems typically include:
- Real-time shipment updates
- Estimated Time of Arrival (ETA) predictions
- Delay notifications
- Route visualization
- Historical shipment records
- Exception monitoring
- Performance analytics
In other words, container tracking has evolved from a basic tracking function into a source of operational intelligence that helps organizations make faster and more informed decisions.
The Challenges of Traditional Shipment Monitoring
Before adopting modern tracking platforms, many logistics teams rely on manual processes that consume significant amounts of time and create operational inefficiencies.
Manual Carrier Checks
One of the most common challenges involves checking shipment status across multiple carrier websites.
A logistics coordinator may need to:
- Open several carrier portals
- Enter container numbers individually
- Review shipment milestones
- Compare updates from different sources
- Copy information into internal systems
When managing dozens or hundreds of shipments simultaneously, these tasks become highly repetitive.
Spreadsheet-Based Tracking
Many organizations continue to manage shipments using spreadsheets.
While spreadsheets are flexible, they introduce several limitations:
- Manual data entry requirements
- Delayed status updates
- Version-control issues
- Increased risk of human error
- Difficulty collaborating across teams
As shipment volumes grow, spreadsheets become increasingly difficult to maintain.
Reactive Decision-Making
Perhaps the biggest challenge is that delays are often discovered too late.
Without automated monitoring, logistics teams may learn about disruptions only after customers begin asking questions or inventory shortages start affecting operations.
This reactive approach reduces the time available to:
- Adjust transportation plans
- Reschedule warehouse activities
- Notify customers
- Allocate alternative inventory
The result is higher operational risk and reduced supply chain agility.
How Modern Container Tracking Platforms Work
Modern visibility platforms solve these challenges by collecting and consolidating shipment information from multiple data sources into a single interface.
Data Sources
Today’s tracking systems aggregate information from:
- Ocean carriers
- Port community systems
- Terminal operators
- Vessel tracking networks
- Inland transportation providers
- Customs and logistics databases
Instead of requiring employees to check each source individually, the platform automatically gathers and organizes relevant shipment information.
Centralized Dashboard
The collected data is displayed through a centralized dashboard.
This allows logistics teams to view:
- Active shipments
- Current container status
- Estimated arrival dates
- Delay risks
- Historical shipment activity
Users gain a complete overview of transportation operations without switching between multiple systems.
Automated Updates
One of the most valuable capabilities is automated event monitoring.
The platform continuously monitors shipment activity and automatically refreshes information when new events occur.
Examples include:
- Vessel departure confirmations
- Port arrival notifications
- Terminal release events
- Customs clearance updates
- Route deviations
- Schedule changes
Many platforms also generate exception alerts when delays or disruptions are detected.
Advanced solutions recalculate ETAs dynamically as new information becomes available, providing more accurate arrival forecasts throughout the shipment journey.
Operational Benefits for Logistics Teams
Saving Time Through Automation
Time savings are often one of the first measurable benefits organizations experience.
Consider a logistics coordinator responsible for monitoring 500 active containers each month.
Using a manual process:
- Average status check: 3 minutes
- 500 containers × 3 minutes = 1,500 minutes
- Total monthly monitoring time: approximately 25 hours
With a modern tracking platform:
- Status collection becomes automated
- Alerts highlight only exceptions requiring attention
- Monitoring workload falls to approximately 3–5 hours monthly
This represents a reduction of up to 80% in routine tracking effort.
Those recovered hours can be redirected toward customer support, planning activities, and problem-solving tasks that generate greater business value.
Faster Response to Delays
Transportation disruptions are unavoidable.
Common examples include:
- Vessel schedule changes
- Port congestion
- Customs processing delays
- Transshipment disruptions
- Weather-related incidents
The difference lies in how quickly companies become aware of the problem.
If a five-day delay is detected immediately through automated alerts, logistics teams can:
- Adjust trucking schedules
- Reschedule warehouse labor
- Update inventory forecasts
- Inform customers proactively
Earlier awareness often reduces the operational impact of disruptions significantly.
Reducing Human Error
Manual processes inevitably introduce mistakes.
Common issues include:
- Incorrect container numbers
- Missed shipment updates
- Outdated spreadsheet records
- Duplicate entries
Automated synchronization reduces reliance on manual data entry and improves information consistency across teams.
Greater accuracy leads to better planning decisions and fewer operational surprises.
Improving Team Productivity
Many logistics professionals spend a large portion of their day collecting information rather than acting on it.
Tracking platforms automate repetitive monitoring activities, allowing employees to focus on:
- Exception management
- Customer communication
- Strategic planning
- Supplier coordination
- Transportation optimization
This shift from administrative work to decision-making work can significantly improve overall team productivity.
Real-World Optimization Examples
Example 1: Import Business
An importing company receives approximately 200 containers each month.
Before implementing a visibility platform:
- One employee spends roughly 15 hours weekly monitoring shipments
- Total monthly monitoring workload: approximately 60 hours
After implementation:
- Most shipment updates become automated
- Manual monitoring falls to around 10 hours monthly
Result:
- Approximately 50 hours saved each month
- Faster issue identification
- Greater focus on supplier coordination and inventory planning
Example 2: Freight Forwarder
Freight forwarders frequently receive requests from customers asking for shipment updates.
Without self-service visibility:
- Support teams answer dozens of status inquiries daily
- Significant time is spent gathering shipment information
After implementing a customer-accessible tracking portal:
- Customers can check shipment status independently
- Notifications are generated automatically
Potential outcome:
- Up to 70% fewer shipment status emails and calls
- Reduced support workload
- Faster customer response times
- Improved client satisfaction
Example 3: Retail Supply Chain
A retailer relies on imported inventory to maintain stock availability.
Previously:
- Shipment delays were discovered late
- Warehouse schedules required frequent adjustments
- Stock shortages occurred unexpectedly
After introducing real-time ETA monitoring:
- Delay alerts arrive earlier
- Inventory planning becomes more accurate
- Warehouse operations can prepare proactively
Result:
- Improved inventory availability
- Reduced operational disruptions
- Greater predictability across the supply chain
Key Performance Metrics Improved by Tracking Platforms
| Metric | Traditional Process | With Tracking Platform |
| Time spent monitoring shipments | 20–60 hours/month | 3–10 hours/month |
| Delay detection speed | Hours or days | Near real time |
| ETA accuracy | Moderate | Significantly improved |
| Shipment visibility | Fragmented | Centralized |
| Manual data entry | High | Minimal |
| Customer inquiry volume | High | Reduced significantly |
| Response time to disruptions | Reactive | Proactive |
| Operational efficiency | Limited by manual processes | Improved through automation |
While actual results vary between organizations, the overall trend is consistent: greater visibility leads to faster decisions and more efficient operations.
Beyond Tracking: Additional Features of Modern Visibility Platforms
Container tracking platforms have evolved considerably beyond basic shipment monitoring.
Many modern solutions now provide a broader set of supply chain intelligence capabilities, including:
Route Visualization
Interactive maps help teams understand where shipments are located and how cargo is moving through transportation networks.
Historical Shipment Analytics
Organizations can analyze past shipment performance to identify recurring delays and improve planning decisions.
Carrier Performance Monitoring
Performance metrics help businesses compare transportation providers based on reliability, transit times, and schedule consistency.
Automated Notifications
Users receive alerts when important events occur, reducing the need for manual monitoring.
Multiple Shipment Tracking
Large shipment volumes can be monitored simultaneously through centralized dashboards.
API Integrations
Many platforms connect directly with ERP, CRM, transportation management, and inventory systems, creating a more unified operational environment.
Reporting Dashboards
Executives and operations teams can monitor key logistics performance indicators through visual reporting tools.
Solutions such as TimeToCargo illustrate this evolution by combining container tracking with route visualization, time-based notifications, shipment dashboards, multiple-container monitoring, and API integrations that support broader supply chain workflows.
The industry is clearly moving from simple tracking tools toward comprehensive visibility and intelligence platforms.
Which Businesses Benefit Most?
Importers
Importers depend on predictable arrival schedules to manage inventory levels and maintain business continuity.
Exporters
Exporters require visibility across international transportation routes to coordinate customer deliveries and production planning.
Freight Forwarders
Freight forwarding companies manage large shipment volumes and benefit from centralized monitoring and customer visibility tools.
Manufacturers
Manufacturers often rely on just-in-time supply chains and need accurate arrival forecasts for critical materials.
Retailers
Retail businesses depend on reliable inventory replenishment and benefit from earlier detection of transportation disruptions.
Conclusion
Container tracking is no longer simply a tool for locating cargo.
Modern visibility platforms have become essential operational technologies that help businesses automate routine processes, reduce manual workload, improve decision-making, and respond faster to supply chain disruptions.
By centralizing shipment information, providing real-time updates, and automating exception monitoring, these systems allow logistics teams to save dozens of working hours every month while improving service quality and operational efficiency.
The ability to identify delays earlier, improve ETA accuracy, and reduce customer inquiry volumes creates measurable business value across a wide range of industries.
As global supply chains continue to face uncertainty and increasing complexity, real-time visibility is rapidly becoming a competitive advantage rather than an optional capability.
Organizations that invest in digital logistics technologies today are likely to be better positioned to manage disruptions, improve customer experience, and build more resilient supply chains in the years ahead.
If you’re thinking about domestic or commercial solar panel installation, you should also consider battery storage. Solar battery storage allows you to store electricity generated by your solar panels so you can use it when you need it. Without a battery, any unused energy your system produces is usually sent back to the grid. With battery storage, you keep more of that energy on-site, making your system more efficient and giving you greater control over how and when you use electricity.
How energy is generated and stored
Solar panels generate electricity during daylight hours, with the highest output typically occurring around midday. This energy is produced as direct current (DC) electricity. An inverter then converts it into alternating current (AC), which can be used in your home or business.
If your system generates more electricity than you are using at that moment, the excess energy can be directed into a battery instead of being exported to the grid. The battery stores this electricity so it can be used later, such as in the evening or during periods of low sunlight.
Using stored energy
When your solar panels are not producing enough electricity to meet your needs, the system can draw energy from the battery. This usually happens automatically, without any action required from you. For example, after sunset, your stored energy can power lighting, appliances, or equipment.
If the battery becomes fully discharged, your system will then take electricity from the grid as normal. This ensures that you always have access to power when you need it.
How the system is managed
Solar battery systems are typically managed by a control system that decides when to store energy and when to use it. This process is automated to maximise efficiency. The system will usually prioritise using solar energy first, then stored energy, and finally grid electricity if needed.
Many systems include monitoring tools that allow you to track how much energy you generate, store, and use. This can give you a clearer understanding of your energy habits and help you make more informed decisions about usage.
Charging the battery
The battery is charged using excess solar energy generated during the day. In some cases, it can also be charged using electricity from the grid, for example during off-peak hours when energy is cheaper. This depends on how your system is set up and your specific requirements.
Charging is carefully managed to protect the battery and ensure long-term performance. Modern batteries are designed to handle regular charging and discharging cycles over many years.
Discharging the battery
When energy is needed, the battery releases stored electricity back into your system. This process is known as discharging. It allows you to use your own stored energy instead of purchasing electricity from the grid.
The system will control how quickly the battery discharges based on your energy demand and the available charge. This helps maintain a balance between meeting your needs and preserving the battery’s lifespan.
Improving energy efficiency
By storing excess solar energy, battery systems help you use more of the electricity your panels generate. This reduces the amount of energy you need to import from the grid and can lead to lower energy costs over time.
It also means less energy is exported, which can be beneficial if export rates are lower than the cost of buying electricity. Overall, this improves the efficiency and value of your solar system.
Providing backup power
Some solar battery systems can provide backup power during a power cut. If configured to do so, the battery can supply electricity to selected circuits when the grid is unavailable. This can help maintain essential functions, such as lighting or critical equipment.
Not all systems include this feature, so it is important to consider this when choosing a battery.
Maintenance and lifespan
Solar batteries are designed to be low maintenance. They generally require minimal attention beyond occasional checks to ensure they are operating correctly. Most modern batteries have a lifespan of 10 to 15 years, depending on usage and the type of battery.
Over time, the battery’s storage capacity may gradually decrease, but it will continue to provide value throughout its lifespan.
Conclusion
Solar battery storage works by capturing excess energy generated by your solar panels and making it available for use at a later time. It operates automatically to store and release energy as needed, helping you make better use of renewable power. By adding a battery to your system, you can improve efficiency, reduce reliance on the grid, and gain greater control over your energy use.
The machine shop at 2 AM has a particular sound. It’s not the roar of the daytime, when people are yelling over spindles and forklifts beep their warnings. It’s a hum. A drone of machines at work, slow and steady, nearly meditative, and as they have nothing to watch over, their doors shut, and their lights throwing long blue rectangles on the concrete floor.
I am in the presence of Marcus who is the supervisor of night shift. He has twenty-two years of CNC machine running. A fine gray grime permanently stains his hands, which cannot be removed by soap.
I listen. I hear the machine.
“No,” I admit.
He nods, still listening. “It’s nervous.”
You push it, it’ll chatter. Leave a bad finish. The part passes inspection, maybe, but it’s stressed. It’ll move later, during assembly. The customer won’t know why it doesn’t fit. They’ll blame their design. But it’s not their design. It’s us. It’s me not listening.”
But the machine’s sound shifts, just slightly. The whine evens out. “There,” he says. “Happy now.”
The Silence of the Day Shift
During the day, the shop is a different world. Salespeople are on the phone. Engineers are reviewing files. Project managers are updating spreadsheets. Everyone is busy, moving, talking.
But in the quiet moments, when a day shift machinist finishes a setup and hits the green button, they do the same thing Marcus does. They listen. They watch the chips curl off the tool. They run a finger along the first part, not measuring, just feeling. This is the ritual. It’s not in the quality manual.
The One That Got Away
Every machinist has a story about the one that got away. The part they shipped that came back. Marcus has his.
“Five years ago,” he says, still staring at the now-happy machine. “Medical component. Titanium. I was rushing. We had a deadline, the customer was breathing down my neck. I skipped a finish pass. The part measured fine.
He pauses. The machine hums.
“Six months later, I get a call. The part failed in surgery. Not catastrophic, thank God. But it didn’t perform. The surgeon had to switch to a backup. The patient was under longer than necessary. All because I rushed. All because I didn’t listen.”
He looks at me. Why are you asking me why I am here at 2 AM? Why I am the one who listens to nervous machines? He says because I am the guy who did not hear that day. And I will have to pay my life long to recoup it.
What You’re Actually Paying For
When you send a RFQ to a shop, you’re not just paying for machine time and material. You’re paying for Marcus’s guilt. You’re paying for the night shift rituals. You’re paying for the decades of mistakes that taught someone to hear the difference between a happy machine and a nervous one.
You’re paying for the institutional memory of a thousand tiny failures that never happened to your part because they happened to someone else’s, years ago, and the lesson was absorbed into the fingertips of every machinist in the building.
This is the invisible line item on every invoice. It’s never listed. It’s never discussed. But it’s the most important thing you’re buying.
The Part That Arrives
When your box comes at last, when you reach out and draw out that perfect, shining part, when you feel the edge of your thumb, when you find it sliding across, and you find out that it is not hard at all, but smooth, and solid, and sure, you will be too blind to know about Marcus. You will never hear of the 2 am changes or the guilt or the listening.
You will simply know that it is right. Solid. Quiet.
That silence is the voice of a promise made. It is the voice of a person devoted enough to listen or pay attention when nobody is around. It’s the sound of CNC machining services that understand the difference between making a part and honoring a trust.
The machine made the chips. But Marcus made the part.


Is Hizzaboloufazic Good or Bad? Full 2025–2026 Analysis & Safety Review

Sustore: What “Sustore” Means Across E-Commerce, Retail, and IT