
Business
Shelves Woodworking: The Ultimate Guide for Beginners to Advanced

shelves Woodworking is one of the most satisfying and practical projects you can take on—whether you’re building simple storage in a workshop, elegant built‐ins in a living room, or floating wall shelves that seem to hover. In this comprehensive guide, we’ll walk you through everything you need to know: planning, material selection, joinery, mounting, finishing, and more. Read on and by the end you’ll feel confident customizing your own shelf build.
1. Why Build Your Own Shelves Woodworking Style?
There’s a big difference between buying ready-made shelving and committing to shelving built by you with care and craftsmanship. When you choose shelves woodworking, you gain:
-
Customization: You control the dimensions, style, wood species, finish and placement.
-
Durability: Proper joinery and material selection mean your shelf system will outlast many store-bought units.
-
Aesthetic value: A well-finished wooden shelf adds warmth and character to the space, especially compared with cheap metal or particle-board alternatives.
-
Skill growth: Building shelves is a great way to sharpen woodworking skills—measuring, cutting, joinery, mounting and finishing.
-
Sense of accomplishment: There’s something deeply satisfying about seeing a row of books, prized objects or tools neatly arranged on a shelf you crafted yourself.
And because shelving covers so many use-cases—from storage in the garage to display in the living room—this type of woodworking project offers huge versatility.
That said, woodworking shelves also comes with responsibilities: you must design for strength, plan for the load, select appropriate materials, and finish for longevity. Mistakes in these areas can lead to sagging shelves, unstable mounts or unfinished aesthetics. That’s why we’ll walk through each step deeply.
2. Planning Your Shelves Woodworking Project
2.1 Define Purpose & Location
Start by asking: What will these shelves hold? Where will they sit? The answers determine size, material and mount type. For example:
-
Heavy items (paint cans, tools) need deep shelves, strong supports and robust materials.
-
Display items (books, decor) allow shallower depths but call for clean appearance and finishing.
-
Floating shelves create a minimalist look but require hidden strong support.
2.2 Measure & Span Considerations
How long and deep your shelf will be influences how it’s supported. According to woodworking experts, choosing dimensions carefully avoids sag or failure. Key rules:
-
Select shelf depth based on the largest item you’ll store.
-
The span (distance between supports) matters: longer spans require thicker boards, stiffening or more supports.
-
For example: one guideline: “the eye will notice deflection of 1/32 in per running foot” when loaded.
2.3 Choose Adjustable vs Fixed
Decide if you want adjustability (shelf pins, adjustable brackets) or fixed shelves (cut to space).
-
Adjustable gives flexibility for years of changing use.
-
Fixed often cheaper, faster, and more rigid.
WOOD Magazine’s guide lists many options: shelf pins, adjustable standards, fixed dadoes.
2.4 Sketch & Material List
Create a simple drawing. Mark thickness, widths, bracket/cleat locations, joinery. List every board, fastener, bracket, etc.
Planning ahead prevents unnecessary mistakes.
2.5 Mounting & Wall Considerations
-
If wall-mounted, find studs or solid anchor points; drywall alone won’t suffice for heavy loads.
-
Determine bracket type (cleats, metal brackets, hidden floating support).
-
Consider wall finish, outlet access, wiring or other obstructions. The Spruce article on span and spacing gives excellent mounting guidelines.

3. Materials & Wood Selection for Shelves Woodworking
3.1 Wood Type & Thickness
The choice of material dramatically affects performance and cost. Some options:
-
Solid hardwoods (oak, maple, walnut) – strong, beautiful grain, excellent for visible shelving; more expensive.
-
Softwoods/plywood – more affordable, still acceptable for many uses.
-
Plywood/MDF/particle-board – economical, especially for painted shelves; but thinner versions can sag under heavy load.
Woodwork Center’s DIY guide notes that plywood is a popular strong choice, and that pre-drilling is often required.
3.2 Board Thickness & Supports
To avoid sag, you must select a board thick enough (or add reinforcement) for the span and load. For example: Boards supported only at ends need heavier section, or thinner board with lip/edge or backing. The WOOD magazine guide shows how edging or thicker front can reduce sag by half.
3.3 Front Edging & Appearance
When using plywood, adding a solid wood front edge improves both strength and aesthetics. WOOD guide: “Solid wood glued onto full length of shelf’s front edge adds a great deal of strength… also essential for appearance when you use plywood.”
3.4 Hardware & Brackets
Selecting the right support hardware is crucial. Options include: shelf pins (adjustable), metal bracket arms, cleats (wood or metal), floating shelf brackets. Make sure the rating of bracket matches your projected load.
Better Homes & Gardens guide shows proper method to hang floating shelves.
3.5 Joinery & Construction Methods
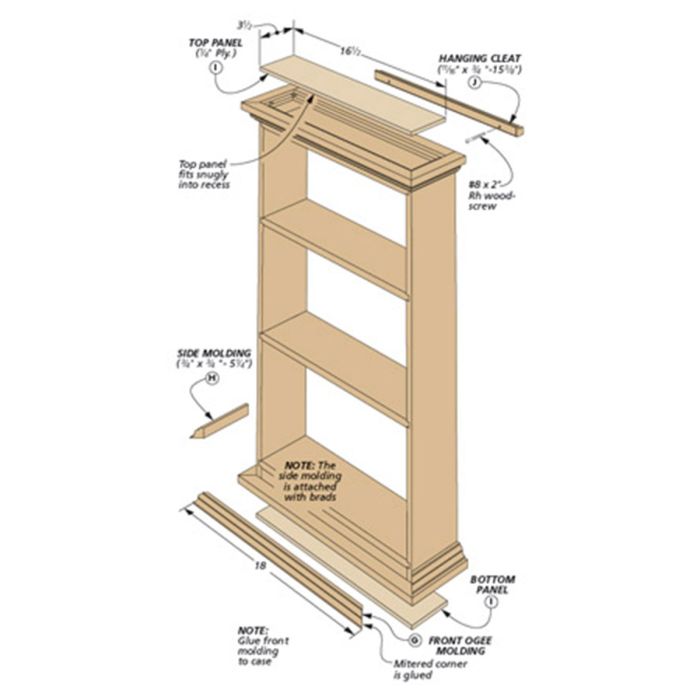
For fixed shelves or built-ins: use dados, rabbets, biscuits, or dowels for strength. The dado joint is common to seat shelf ends into sides for rigidity.
3.6 Finishing & Sealing
Finish protects wood and defines appearance. Decide on stain, paint, clear coat, or natural finish. Ensure finish suits environment (humidor? bathroom?). The Woodwork Advisor article emphasizes finishing and maintenance.


4. Building Techniques for Shelves Woodworking
4.1 Cutting & Layout
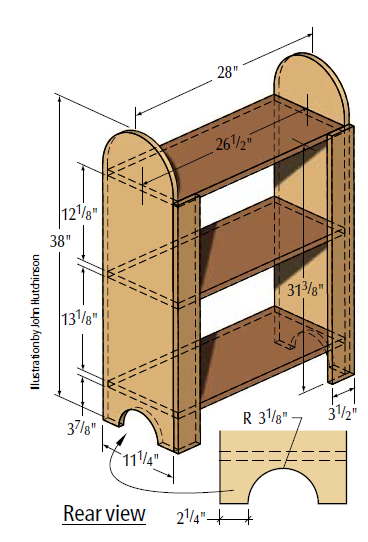
Measure twice, cut once. Ensure boards are square, surfaces clean. For custom shelving: cut sides, top, bottom, shelves first. Use table saw or track saw for straight cuts.
From Instructables bookcase build: “Cut the boards for the bookcase… a table saw will provide the safest and most accurate cuts.”
4.2 Joinery and Assembly
-
Use glue + screws or more refined joinery (dowels, biscuits). For visible shelving units you may prefer clean joints.
-
If building built-in shelving, you might cut dados into sides to insert shelf ends. WOOD guide covers this in detail.
4.3 Mounting to Wall / Installing Brackets
-
Use stud finder, mark stud locations.
-
Install cleats or brackets; ensure level and spaced appropriately.
-
For floating shelves, install hidden bracket, slide shelf on, secure underside screws. Better Homes & Gardens method the same.
-
The Spruce article reminds that span and separation matter.
4.4 Reinforcing, Avoiding Sag
For longer shelves or heavy loads:
-
Use thicker boards or support in middle.
-
Use edge banding or front lip to reduce deflection. WOOD guide: added edging reduced sag by half.
-
Consider adding vertical support under shelf, especially for wide spans. Real-world reddit users recommend mid-supports for long spans.
4.5 Finishing the Shelf
After build: sand to smooth, apply stain or paint, then finish coat (polyurethane, oil, wax). Consider rounding front edge for safety and visual appeal. The Woodwork Advisor article suggests stain/wipe finish and protective topcoat.


5. Types of Shelves Woodworking: Styles and Ideas
5.1 Floating Wall Shelves
These shelves appear to have no visible brackets—clean and modern. But installation requires hidden hardware, strong wall anchor and careful finishing. WOOD magazine has a plan for floating wall shelves.
5.2 Fixed Built-In Shelves / Bookcases
Traditional built-in shelving units anchored to walls, often with side panels, back panels and fixed shelf heights. Durable and elegant. WOOD magazine’s “Shelves for Show” is an example.
5.3 Adjustable Shelves
Shelves where height can be changed via shelf pins or adjustable standards. Very versatile. Wikipedia article on adjustable shelving explains.
5.4 Stackable / Modular Shelves
Modules that can be stacked vertically or arranged laterally. Great for flexible storage. The Minwax beginner project shows stackable shelves.
5.5 Tool / Workshop Shelves
Heavy‐duty shelving designed for garage or workshop storage of heavy tools, lumber or hardware. Example: tool storage shelves plan.
5.6 Specialty Shelves
Corner shelves, floating hexagon shelves, narrow display ledges—many creative woodworking shelves ideas. Pinterest boards reflect many inspirations.
6. Mounting & Installation Best Practices
6.1 Finding Studs & Anchors
For wall‐mounted shelves, always locate studs or use strong anchors. Studs spaced 16-24” apart typical. The Spruce article outlines material span and support.
6.2 Leveling and Spacing
Use a level for straight installation. For multiple shelves, measure equal vertical spacing. Clear shelf height determined by objects you store.
6.3 Shelf Span & Support Spacing
The longer a shelf span without support, the greater the sag risk. Use brackets or support mid‐span if shelf is wide. Reddit woodworking users frequently discuss this.
6.4 Secure Brackets and Hidden Supports
In floating shelves especially:
-
Drill pilot holes into studs.
-
Secure braces tightly.
-
Slide shelf onto bracket then screw underside to prevent sliding. Better Homes & Gardens gives a clear step by step.
6.5 Final Stabilization & Load Testing
Before adding heavy items:
-
Check for sway.
-
Place increasing weights gradually.
-
Tighten screws after first week (wood may settle).
-
Avoid placing heavy loads far out on a shelf edge without support.
7. Finishing, Maintenance & Longevity
7.1 Finishing Techniques
-
Staining: Enhances grain and color—apply evenly, wipe off excess.
-
Clear Finish: Polyurethane, lacquer or oils protect the wood surface.
-
Paint: For sleek look or matching décor—ensure good primer.
Woodwork Advisor gives finishing advice for wood wall shelves.
7.2 Maintenance
-
Dust regularly.
-
Avoid soaking wood with water—wipe damp, then dry.
-
Tighten loose screws and brackets annually.
-
Monitor sagging over time, especially if load changes.
-
For painted shelves: touch-up chips as soon as they occur to protect underlayer.
7.3 Avoiding Problems
Common issues and fixes:
-
Sagging mid-span → add central support, reduce span, increase thickness.
-
Warping → choose stable wood, acclimate boards to room humidity, allow expansion.
-
Finish peeling → ensure proper surface prep and use high‐quality finish.
-
Mount failure → ensure brackets anchored in studs or use proper drywall anchors rated for load.
8. Common Mistakes in Shelves Woodworking & How to Avoid Them
Mistake #1: Under-estimating the load or span
If you use thin boards for long spans to hold heavy items, you’ll face sag or failure. The Spruce article warns of span/spacing risks.
Fix: Choose thicker wood, add supports or reduce span.
Mistake #2: Mounting only to drywall
Drywall anchors alone might fail under significant weight.
Fix: Always anchor to studs or use heavy‐duty anchor/plate system rated appropriately.
Mistake #3: Poor finish prep
Untreated or poorly sealed wood will chip, stain and wear quickly.
Fix: Sand well, remove dust, apply suitable finish.
Mistake #4: Mis-measuring and cutting
A small error in width or square will show up dramatically.
Fix: Measure twice, clamp and test fit before final glue. The Instructables build stresses accuracy.
Mistake #5: Ignoring fail-safe support
Even aesthetic shelf designs need enough structure. Reddit woodworkers warn about long spans without center support.
Fix: Add central support for spans beyond ~3 feet, or use thicker material.
9. Advanced Tips & Creative Ideas for Shelves Woodworking
-
Hidden hardware / floating look: Use concealed brackets for minimalist look.
-
Mixed materials: Combine wood with metal brackets, glass shelf tops or leather accents.
-
Live edge shelving: Use live edge boards for dramatic, natural look.
-
Integrated lighting: LED strips beneath shelf or inside built‐in units create ambience.
-
Custom joinery: Use dovetail or through‐tenon joinery for visible craft detail.
-
Modular units: Build stackable shelving modules that adapt to changing space. The Minwax beginner project explores stackables.
-
Corner shelving / sloped ceilings: Use templates and angled cuts for tricky spaces. Reddit users discuss this challenge.
10. Cost, Time & Tools Breakdown for Typical Shelves Woodworking Projects
Time
-
Simple wall shelf: a couple of hours (cut, sand, finish, mount).
-
Built-in bookcase: several days (cutting, joinery, assembly, finishing).
-
Floating shelf system wall-wide: several sessions (measurement, bracket install, checking for level, finish, mount).
Cost
Depends heavily on wood species, hardware and finishing.
-
Budget materials (plywood + brackets): low cost.
-
Premium hardwood + custom finish + heavy duty hardware: higher cost.
Make sure to budget for finishing materials and possible extra support hardware if load high.
Tools
Essential tools include: measuring tape, level, stud finder, drill/driver, table or track saw (optional but helpful), clamps, sander, finishing supplies.
More advanced joinery requires router, biscuit joiner, dado set, etc. The Woodwork Center article outlines tool needs.
Conclusion
Shelves woodworking is a rewarding craft that blends utility, design and personal satisfaction. Whether you’re building a basic wall shelf or a full built-in system, giving attention to planning, materials, construction and finishing makes all the difference. Keep in mind:
-
Match shelf design to intended use.
-
Respect span, load and support requirements.
-
Choose material and finish wisely.
-
Install accurately and securely.
By following these principles, your wooden shelves will not only perform well today—they’ll stand the test of time. So grab your saw, measure carefully, and build something you’ll be proud of.
FAQs
1. How deep should a shelf be for general storage?
Depth depends on what you store. For books/display: ~10-12″ is common. For tools/larger items: 16″ or more may be needed. Always measure your items first.
2. What thickness of board should I use for a 4′ span?
For typical solid wood board under moderate load, ¾″ may suffice for ~30–36″ spans. For 4′ plus heavy items, consider 1″ thick board or support every ~18–24″. See span guidelines.
3. Can I use MDF or particle-board for shelving?
Yes, for lighter loads and painted finishes MDF/particle can work. But they sag faster under heavy load or wide spans. The Spruce article suggests caution.
4. How do I install floating wood shelves safely?
Locate studs, install hidden bracket firmly, slide shelf on, then secure from underside with screws to prevent slipping. Level and test before loading.
5. What finish should I use to protect wooden shelves?
Depends on look and use. Clear polyurethane gives durable protection. Oil finishes bring out natural grain. Painted finishes require good primer and top coat. The Woodwork Advisor article covers finishing.

For more than 40 years, Eron Johnson Antiques has been one of the most respected names in the American antiques industry. Known for its extraordinary collection of museum-quality furniture, architectural salvage, fine art, lighting, and decorative objects, the Denver-based gallery attracts collectors, interior designers, architects, homeowners, and antique enthusiasts from around the world.
Unlike a traditional antique mall, Eron Johnson Antiques specializes in carefully curated pieces spanning over 400 years of design history, from the 17th century through the mid-20th century. Whether you’re restoring a historic property, decorating a luxury residence, or searching for a one-of-a-kind statement piece, this iconic showroom offers one of the largest and most diverse antique collections in Colorado.
This comprehensive 2026 guide explores the company’s history, inventory, shopping experience, online buying options, and why it continues to rank among Denver’s premier antique destinations.
The History of Eron Johnson Antiques: More Than 40 Years of Excellence
The story of Eron Johnson Antiques began long before the business became internationally recognized. Founder Eron Johnson entered the antiques trade at just 19 years old, traveling across the United States in an old van searching for rare and historic treasures to sell to antique dealers.
By the age of 22, Johnson had opened his first gallery, laying the foundation for what would become one of Colorado’s most respected antique businesses.
As demand grew, the company expanded significantly:
- 1995: Opened a 20,000-square-foot showroom
- 2008: Added a 30,000-square-foot warehouse dedicated primarily to architectural salvage
- Today, the business operates from a beautifully restored 1920s industrial building in Denver’s Valverde neighborhood.
During the 2010s, the company embraced the brand philosophy “Centuries of Design.” Rather than focusing solely on traditional antiques from the 17th through 19th centuries, Eron Johnson expanded the collection to include:
- Mid-century modern furniture
- Contemporary artwork
- Designer lighting
- Decorative arts
- Historic architectural elements
- Antiquities from multiple cultures
This evolution allows visitors to experience several centuries of craftsmanship under one roof while preserving the gallery’s reputation for authenticity and quality.
Explore Over 8,000 Antiques Covering More Than 400 Years of Design
One of the biggest reasons collectors visit Eron Johnson Antiques is the incredible size and diversity of its inventory.
The company houses over 8,000 antiques, with 3,000+ pieces displayed inside the showroom and 5,000+ items available through its online catalog, which is updated daily.
Antique Furniture
Furniture collectors can browse exceptional examples of:
- English antiques
- French antiques
- Continental European furniture
- American period furniture
- Baroque furniture
- Georgian pieces
- Victorian furniture
- Renaissance-inspired designs
- Mid-century modern classics
Many pieces date from the 1600s through the 1900s, making the gallery a valuable resource for authentic period interiors.
Architectural Salvage
Architectural salvage remains one of the company’s signature specialties.
Available inventory regularly includes:
- Antique doors
- Stained glass windows
- Marble fireplace surrounds
- Limestone fireplaces
- Iron gates
- Columns
- Garden ornaments
- Antique mantels
- Architectural carvings
- Historic ironwork
Rare finds may include 18th-century French doors, 17th-century Indo-Portuguese Baroque carvings, reclaimed building materials, and decorative architectural fragments sourced from around the world.
Lighting and Decorative Arts
Collectors also discover an impressive selection of:
- Antique chandeliers
- Wall sconces
- Art glass lamp shades
- Interior lighting
- Exterior lighting
- Decorative mirrors
- Bronze sculptures
- Antique clocks
- Ceramics
- Porcelain
- Decorative accessories
Fine Art Collection
The gallery regularly features:
- European paintings
- American artwork
- Asian art
- Antique prints
- Sculptures
- Decorative objects
- Historic collectibles
Each department reflects the company’s emphasis on quality, authenticity, and historical significance.
Why Interior Designers, Architects, and Collectors Choose Eron Johnson Antiques
One factor separating Eron Johnson Antiques from many antique stores is its close relationship with the professional design community.
The gallery serves:
- Interior designers
- Architects
- Contractors
- Luxury homeowners
- Property developers
- Museums
- Antique collectors
- Retail customers
Professional clients appreciate the company’s:
- Trade pricing
- Worldwide shipping
- Project sourcing
- Custom recommendations
- Architectural salvage expertise
- Estate sale assistance
- Prop rentals
- Event rentals
Design professionals frequently source statement pieces for luxury homes, boutique hotels, commercial projects, restaurants, and historic renovations.
Service extends well beyond Denver, including:
- Cherry Hills Village
- Greenwood Village
- Englewood
- Bow Mar
- Glendale
- Southglenn
- Ken Caryl
- Vail
- Other Colorado communities
- International destinations through worldwide shipping
Customer reviews consistently describe the gallery as a “treasure trove,” praising its knowledgeable staff, exceptional customer service, and truly one-of-a-kind inventory.
Visiting Eron Johnson Antiques in 2026: Location, Hours, and Visitor Information
Planning a visit is straightforward, and the gallery itself is considered an attraction for architecture and design enthusiasts.
Current Address
377 South Lipan Street, Unit B
Denver, Colorado 80223
Phone
(303) 777-8700
Opening Hours
- Tuesday: 10:00 AM – 5:00 PM
- Wednesday: 10:00 AM – 5:00 PM
- Thursday: 10:00 AM – 5:00 PM
- Friday: 10:00 AM – 5:00 PM
- Saturday: 10:00 AM – 5:00 PM
- Closed: Sunday and Monday
Visitor Amenities
Visitors can expect:
- Wheelchair accessibility
- Parking available
- Restrooms
- Wi-Fi access
- Credit card payment options
- Friendly, knowledgeable staff
The restored 1920s industrial warehouse enhances the experience, creating a unique atmosphere where historic architectural elements blend seamlessly with curated antiques.
Important Note: Some online directories still reference the former location at 451 N Broadway Street, but the current primary showroom is located on South Lipan Street.
Buying Online: Shop Thousands of Antiques from Anywhere
Not everyone can travel to Denver, which is why Eron Johnson Antiques has invested heavily in online shopping.
The company’s website features:
- 5,000+ antiques online
- Daily inventory updates
- Detailed photographs
- Product descriptions
- Worldwide shipping
Additional online platforms include:
Houzz
The company showcases:
- More than 21 design project portfolios
- Thousands of listed antiques
- Design inspiration
- Professional collaborations
eBay Store
Eron Johnson maintains an active eBay store with:
- 2,000+ completed sales
- Hundreds of followers
- Antique lighting
- Art glass shades
- Chinese export porcelain
- Decorative accessories
- Furniture
Major Auction Partnerships
The company has also partnered with Leslie Hindman Auctioneers for significant inventory auctions featuring:
- 17th-century furniture
- 18th-century antiques
- 19th-century decorative arts
- 20th-century furnishings
- Architectural antiques
Customers regularly praise the gallery for efficient communication, careful packaging, and fast worldwide shipping.
What Makes Eron Johnson Antiques Stand Out in 2026?
Several characteristics distinguish Eron Johnson Antiques from other antique dealers.
Massive Selection
Few American galleries offer inventory spanning over four centuries, from the 1600s to iconic mid-century modern pieces.
Architectural Expertise
The company is especially respected for its extensive architectural salvage collection, including fireplaces, stained glass, doors, columns, ironwork, and reclaimed architectural elements rarely found elsewhere.
Global Sourcing
Inventory is carefully sourced from:
- England
- France
- Continental Europe
- United States
- Asia
- Other international markets
This global approach ensures an ever-changing selection of authentic antiques.
Design Leadership
The “Centuries of Design” philosophy demonstrates an ability to balance historical preservation with modern design trends, making the gallery equally appealing to traditional collectors and contemporary designers.
Trusted Reputation
Across multiple review platforms, Eron Johnson Antiques consistently earns approximately 4.1 to 4.5-star ratings, with customers frequently highlighting:
- Exceptional customer service
- Unique inventory
- Professional expertise
- Honest advice
- High-quality antiques
Tips for First-Time Visitors and Antique Buyers
To make the most of your visit, keep these practical tips in mind.
- Bring room measurements before purchasing large furniture, mantels, doors, fireplaces, or columns.
- Browse the online catalog first to preview thousands of available antiques before visiting.
- Ask about trade pricing if you are an interior designer, architect, or contractor.
- Allow plenty of time to explore the expansive showroom and warehouse, as many visitors spend several hours discovering new treasures.
- Look beyond furniture—architectural salvage, antique lighting, mirrors, sculptures, sterling silver frames, and decorative accessories also make exceptional gifts and conversation pieces.
- Ask staff about provenance and restoration, especially when investing in rare period antiques or historic architectural elements.
Final Verdict: Is Eron Johnson Antiques Worth Visiting in 2026?
Absolutely. Whether you’re an experienced collector, a first-time antique buyer, an architect restoring a historic property, or an interior designer searching for statement pieces, Eron Johnson Antiques remains one of the finest antique destinations in Colorado.
With more than 40 years of expertise, 50,000+ square feet of showroom and warehouse space, over 8,000 carefully curated antiques, and a reputation built on authenticity and exceptional service, the gallery continues to set the standard for antique sourcing in Denver.
From 18th-century French doors and 17th-century architectural carvings to mid-century modern masterpieces, every visit offers the opportunity to discover pieces with remarkable craftsmanship and rich historical significance.
For anyone seeking authentic period antiques, architectural salvage, museum-quality furniture, or timeless design inspiration, Eron Johnson Antiques remains Denver’s premier destination for centuries of design in 2026.
Business
Erone AI in 2026: The Complete Guide to the Rising Edge-AI Platform Transforming Business, Security & Automation

Artificial intelligence is evolving rapidly, and 2026 marks a major shift from cloud-dependent AI toward edge intelligence. Among the emerging concepts driving this transformation is Erone AI, an edge-first framework that combines artificial intelligence, decentralized infrastructure, enterprise automation, and blockchain-inspired security. Rather than relying entirely on massive cloud data centers, Erone AI emphasizes localized, private, and real-time AI processing directly on devices such as AI PCs, smart cameras, industrial equipment, connected vehicles, IoT devices, and enterprise appliances.
As organizations seek better privacy, lower latency, reduced operational costs, and greater regulatory compliance, Erone AI is becoming one of the most discussed concepts in business automation. From e-commerce personalization and AI-powered enterprises to network autonomy and predictive automation, this guide explores why Erone AI is gaining momentum in 2026 and how businesses can benefit from this edge-first movement.
What Is Erone AI? Understanding the Edge-First AI Movement in 2026
Erone AI represents a modern approach to artificial intelligence that prioritizes on-device processing instead of sending sensitive information to remote cloud servers. Unlike traditional cloud AI platforms, where data constantly travels between users and centralized infrastructure, Erone AI processes information locally, allowing organizations to make intelligent decisions faster while keeping data private.
Core Principles of Erone AI
- Decentralized Security: Sensitive business data remains on local devices, significantly reducing exposure to hacking, cyberattacks, and large-scale data breaches.
- Automation at Scale: Intelligent AI agents move beyond traditional chatbots by handling workflows, orchestration, and operational decisions with minimal cloud dependency.
- Lower Operational Costs: Businesses reduce ongoing cloud computing expenses and minimize reliance on third-party infrastructure.
- Enterprise Scalability: Erone AI adapts to organizations of all sizes, from startups deploying edge devices to multinational enterprises managing thousands of connected systems.
The defining keyword for 2026 is Edge AI, and Erone AI perfectly reflects this transition toward localized, secure, and continuously operating intelligence.
Erone AI in E-Commerce: Personalization, Secure Payments & Smarter Inventory
One of the fastest-growing applications of Erone AI in 2026 is the e-commerce industry, where businesses increasingly prioritize customer privacy while delivering highly personalized shopping experiences.
Instead of uploading customer behavior to external cloud servers, Erone AI analyzes shopping activity directly on local systems, allowing retailers to offer intelligent recommendations without compromising personal information.
Key E-Commerce Benefits
- AI-Powered Personalized Recommendations: Local AI analyzes browsing habits, purchase history, and user preferences while keeping sensitive data private.
- Secure Payment Processing: Decentralized architecture helps reduce cybersecurity risks during checkout by limiting unnecessary data transmission.
- Real-Time Inventory Management: Edge AI predicts inventory demand, automates stock forecasting, and improves warehouse efficiency without relying on constant cloud synchronization.
As major technology companies continue expanding cloud AI ecosystems, businesses adopting Erone AI gain greater independence from rising cloud costs, advertising-driven ecosystems, and centralized AI platforms.
Kneron & COMPUTEX 2026: Demonstrating the Future of Edge AI
A significant public demonstration of principles aligned with Erone AI occurred during COMPUTEX 2026, where Kneron showcased the growing capabilities of edge artificial intelligence.
Held from June 2–5, 2026, at Booth R0532, Taipei Nangang Exhibition Center (TaiNEX 2, 4F), Kneron’s demonstrations highlighted how modern AI can operate efficiently without continuous cloud connectivity.
Major Demonstrations Included
- Generative AI running directly at the Edge, supporting AI PCs, enterprise infrastructure, intelligent driving systems, and smart security applications.
- Localized AI Assistants powered through the Kneo Pi platform integrated with OpenClaw, enabling conversational interactions while processing requests locally.
- Enterprise AI Infrastructure capable of delivering low-latency decision-making without depending on centralized cloud servers.
These demonstrations reinforced a growing industry trend: as cloud AI faces increasing concerns over energy consumption, privacy, scalability, and operational costs, edge-first solutions inspired by concepts like Erone AI offer faster, more secure, and continuously available intelligence.
Erone AI & Autonomous Systems: Powering the Next Generation of Intelligent Enterprises
Beyond retail and automation, Erone AI aligns closely with the broader movement toward autonomous organizations and intelligent infrastructure.
The telecommunications industry has even labeled 2026 the “Year of the AI Ontology,” emphasizing that advanced autonomous systems require standardized knowledge structures to reach Level 4 and Level 5 network autonomy.
Several real-world developments illustrate this shift:
- Telstra’s Chief Architect emphasized that explainable, ontology-driven knowledge systems are essential for removing data silos and enabling autonomous decision-making.
- Argentina’s proposed 2026 legislation introduced the concept of “non-human corporations,” where AI agents may independently perform certain business decisions while remaining under human legal oversight.
In this environment, Erone AI provides the secure, localized intelligence layer necessary for organizations seeking autonomous operations, explainable AI, and reduced dependence on centralized cloud infrastructure.
Benefits of Deploying Erone AI in 2026
Organizations adopting Erone AI across industries report several important operational advantages.
| Benefit | Business Impact in 2026 |
|---|---|
| Enhanced Security | Decentralized data storage significantly reduces breach risk. |
| Improved Efficiency | AI automation streamlines workflows, operations, and decision-making. |
| Lower Operating Costs | Reduced cloud computing requirements decrease overall operational expenses (OPEX). |
| Enterprise Scalability | Suitable for startups, mid-sized businesses, and global enterprises alike. |
These advantages are particularly valuable for industries where privacy, compliance, and low latency are essential, including:
- Healthcare
- Financial Services
- Manufacturing
- Industrial Automation
- Smart Cities
- Retail
- Transportation
- Telecommunications
For organizations operating in regulated industries, localized AI processing provides a competitive advantage by minimizing unnecessary exposure of confidential data.
AI Regulations, Risks & The Future of Erone AI in 2026
As artificial intelligence adoption accelerates, governments worldwide continue developing new regulatory frameworks. Fortunately, many of these regulations favor the localized approach promoted by Erone AI.
Several notable developments include:
- The UN Global Dialogue on AI (July 6–7, 2026) highlighted concerns that AI capabilities are advancing faster than scientific understanding. Edge AI reduces risks associated with large-scale, unchecked cloud deployment by processing information locally.
- Proposed EU and Kenya Artificial Intelligence Bills (2026) emphasize high-risk AI governance, data privacy, transparency, and accountability. Because Erone AI keeps sensitive information on-device, organizations may find compliance easier compared to cloud-only solutions.
- Argentina’s AI liability proposal places legal responsibility on companies for damages caused by AI systems, increasing demand for explainable, transparent, and locally controlled AI.
Future Growth of Erone AI
Industry analysts expect three major trends to shape Erone AI over the coming years:
- Cross-Industry Integration: Edge AI will connect manufacturing, healthcare, retail, logistics, transportation, and enterprise software into a more intelligent digital ecosystem.
- Advanced AI Capabilities: Improvements in machine learning will enable stronger predictive analytics, autonomous decision-making, and real-time optimization.
- Expansion Across Developing Markets: Lower infrastructure costs, enhanced security, and scalability will accelerate adoption in emerging economies where cloud infrastructure remains limited.
Should Your Business Use Erone AI?
| Choose Erone AI If You Need… | Consider Cloud AI If You Need… |
|---|---|
| Real-time decisions without cloud latency | Massive AI model training |
| Strong data privacy and regulatory compliance | Large-scale public chatbot deployment |
| Lower long-term infrastructure costs | Fully centralized analytics across every user |
| Reliable offline or low-connectivity operation | Constant centralized model updates |
The future of enterprise AI is no longer centered exclusively around massive cloud platforms. Erone AI represents a strategic shift toward localized intelligence, enabling businesses to operate faster, more securely, and with greater control over their data. By combining edge computing, AI automation, decentralized security, and enterprise scalability, it addresses many of the biggest challenges facing organizations in 2026—including privacy regulations, rising cloud costs, cybersecurity threats, and the growing demand for autonomous systems.
As businesses continue embracing AI-powered automation, real-time decision-making, and edge computing, Erone AI is positioned as one of the most promising frameworks shaping the next generation of intelligent enterprises. For companies seeking a balance between performance, compliance, security, and operational efficiency, Erone AI is more than an emerging technology trend—it is a blueprint for the future of AI-driven business in 2026.


Veronica Mars Movie (2014): The Complete Guide, Plot, Cast, Kickstarter Record & Legacy

Eron Johnson: Biography, Net Worth, Antiques Empire and Everything You Need to Know

Eron Hodges Biography: Age, Career, Oregon State General Manager, Net Worth & Football Journey
-
 celebrity1 week ago
Eron Hodges Biography: Age, Career, Oregon State General Manager, Net Worth & Football Journey
-
 celebrity6 days ago
Eron Johnson: Biography, Net Worth, Antiques Empire and Everything You Need to Know
-
 celebrity6 days ago
Veronica Mars Movie (2014): The Complete Guide, Plot, Cast, Kickstarter Record & Legacy
-

 celebrity1 week ago
Eron Gordon: Biography, Basketball Career, Family & Where He Is Now in 2026