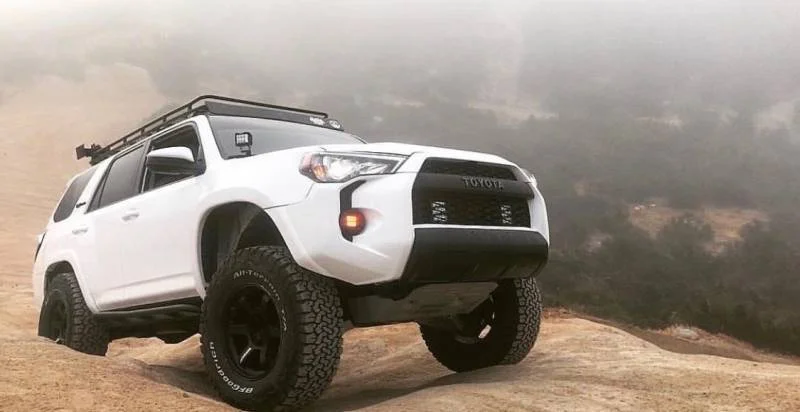
What Is a Flare Upgrade for a Toyota 4Runner?
Toyota 4Runner Flare Upgrade: A “flare upgrade” on a Toyota 4Runner commonly refers to installing fender flares / wheel arch flares / overfenders or wider flare extensions to the bodywork. These are attachments or body pieces that extend the wheel arch outward, providing additional clearance, visual width, and protection from debris.
Key objectives of a flare upgrade include:
-
Increased tire coverage for larger tires or wheels with low offset
-
Protection of body panels (doors, rocker panels, quarter panels) from rocks, mud, and road spray
-
Aggressive / rugged aesthetics—giving the 4Runner a more off-road or overland look
-
Compliance with local laws regarding tire protrusion (many jurisdictions require tires to be covered)
-
Sometimes improved aerodynamics or debris deflection in off-road use
So in short: a flare upgrade is both a functional and stylistic enhancement for a 4Runner, especially for owners who lift their vehicle or put on wider wheels/tires.
Why Upgrade Flares on a 4Runner? Benefits & Motivations
Before committing, it’s good to understand the advantages (and motivations) for flare upgrades on a 4Runner.
✅ Functional Benefits
-
Allows for larger wheel / tire setups
If you upgrade to wider, more aggressive off-road tires, factory arches may not provide enough clearance. Flares give you more “room” so tires don’t rub. -
Body protection
When driving off-road, trails, gravel, or even street use, rocks, dirt, and debris can fling out and chip paint or dent body panels. Flares intercept many of these. -
Legal / regulatory compliance
In many regions, aftermarket wheels that stick out beyond the fender require coverage (so tires aren’t exposed). Flares help you stay street legal. -
Better spray / mud control
With flares, mud, water, and debris are less likely to be thrown onto the vehicle sides or onto following traffic.
🎨 Aesthetic / Styling Benefits
-
A flare upgrade can give a more aggressive, wider stance
-
It visually indicates off-road readiness / ruggedness
-
Many flares are paintable or color matched to the body, creating seamless custom looks
-
Flare styles (pocket flares, bolt-on flares, extended flares) let you express your personal design preference
Because the 4Runner is a popular overland / off-road platform, many owners choose flare upgrades as a high-impact visual mod that also supports performance upgrades like tires & lifts.
Types & Styles of Fender Flares for Toyota 4Runner
Not all flare upgrades are the same. Here are common flare styles / types available for the 4Runner, along with their pros and cons.
1. OEM-style (factory look) flares
These mimic the look of factory flares but with slightly greater coverage. They tend to be lower profile, subtle, and easier to integrate. They’re ideal if you want a clean, “stock +” look without going extreme.
2. Pocket / bolted flares
These are flares with recessed “pockets” or faux rivet details. They have a more muscular, aggressive aesthetic. Many aftermarket flare kits have bolt-on styling but use hidden fasteners or mounting behind.
3. Extended / wide flares / overfenders
These go significantly beyond stock width to allow wide tires, aggressive offsets, and large lift setups. They often require more robust mounting, possibly trimming or body modification.
4. No-drill / adhesive + bolt hybrid flares
Some kits are designed to install with minimal body modification, using adhesive tape (e.g. 3M trim tape) plus factory bolt holes. This is a good choice if you want to avoid cutting or permanent changes. E.g. a 2025 4Runner flare kit adds about 1 inch per corner and uses 3M tape plus OEM bolts.
5. Painted / color-matched vs raw / black finish
You can get flares pre-painted to match your vehicle, or in raw / matte black ABS / plastic, ready for you to paint or leave in contrast. For instance, Rough Country offers paint matched fender flares for 2025+ 4Runner in colors like matte black, wind chill pearl, red, etc.
6. OEM / factory flares (TRD Pro or manufacturer options)
Some trims (TRD Pro or special editions) come with factory extended flares; you may choose to swap those onto other trims. In forums, 2025 TRD Pro fender flare part numbers are shared (75085-35100, 75086-35100, etc.)
When choosing, consider:
-
How wide your wheel / tire setup is
-
Whether you want to avoid cutting or drilling
-
Aesthetics and whether you want paint matched
-
Durability (material, UV resistance, flex)
-
Mounting method and structural support
How to Choose & Plan Your 4Runner Flare Upgrade
Choosing the right flares involves a thoughtful process. Here are key factors to help you plan a successful upgrade.
🧮 Determine your wheel / tire specs & clearance
- Measure how far your wheels / tires stick out now (with current offset, width).
- Plan for future changes (if you intend to go bigger later).
- Ensure the flare gives enough gap to prevent rubbing during articulation, suspension travel, turning, etc.
🔍 Material quality, flexibility & durability
- Premium flares are made from ABS plastic, tri-blend plastic, polyurethane, Dura-Flex ABS, etc.
- Look for UV resistance, impact resistance, flexibility under cold/heat so they don’t crack.
- Some flares come with a warranty (for fading, cracking) — good sign of quality.
🏗 Mounting method & installation
- Kits that use OEM bolt points + adhesive vs ones that require cutting/drilling
- Check how mounting tabs / brackets are designed
- For aggressive / wider flares, sturdy mechanical support is more critical
- Some kits are truly bolt-on with no trimming required (e.g. some 2025 kits)
🎨 Finish options
- Pre-painted to match your 4Runner’s body color
- Matte black / satin black raw finish to leave or paint later
- Textured finish for rugged appearance
- Surface should be sandable / paintable if needed
🛠 Compatibility & trim considerations
- Some flares may not fit certain trims (e.g. TrailHunter, TRD Pro) because they already come with extended fenders. Rough Country notes their flares do not fit TrailHunter or TRD Pro trims.
- Ensure the flare kit is designed for your model year (4Runner generations differ).
- Account for wheel well liners, inner fenders, trim, bumpers around flare edges.
💰 Budget & cost considerations
- Price can vary widely depending on brand, materials, finish, and included hardware.
- Remember to budget for painting, hardware, labor (if not DIY), sealants, adhesives, etc.
- Cheaper kits may save cost but may warp, fade, or break over time.
🛞 Legal / registration considerations
- In some areas, tires protruding beyond fender flares may violate local laws — so the flare width must properly cover tire profile.
- Check your jurisdiction’s regulations on modifications and coverage.
With this planning, you can choose a flare upgrade that fits your performance goals, aesthetics, and long-term reliability.
Steps to Install 4Runner Flares & Best Practices
Here’s a general installation guide and best practices to install aftermarket flares on your Toyota 4Runner. Note: always follow the specific kit instructions.
1. Preparation & surface cleaning
- Remove factory flares (if any) by unscrewing fasteners, clips, trim pieces.
- Clean the mounting surface thoroughly — remove wax, dirt, grease, and use isopropyl alcohol or adhesion promoter.
- Mask off paintwork around edges to protect from scratches during install.
2. Dry-fit and alignment
- Test fit each flare, aligning mounting holes, edges, contours.
- Mark positions with tape or felt-tip markers.
- Ensure no interference with suspension, liner, wiring, or body seams.
3. Mounting hardware & adhesives
- Depending on the kit, attach flare tabs / brackets to the vehicle or flare.
- If adhesive / tape (e.g. 3M molding tape) is used, apply to the flare’s inner lip and press firmly with consistent pressure. For example, the 2025 4Runner flare kit from NYTOP uses 3M™ Super Strength Molding Tape + OEM bolts.
- Apply sealant if required for waterproofing and vibration damping.
4. Bolt-up & torque sequence
- Begin loosely installing all fasteners (or screws) so flares can shift/adjust.
- Once everything lines up, tighten hardware in a crossing pattern to evenly seat the flare.
- Do not overtighten plastic; torque to recommended values in manual.
5. Finishing touches
- Check all edges for gaps and ensure uniform flushness.
- Add edge trim or rubber seals if provided to protect paint and provide smooth interface.
- Reinstall any inner liners, trim panels, or splash shields removed earlier.
- Clean the flares and surrounding area, removing fingerprints or smudges.
6. Curing & settling
- If adhesive was used, avoid high-pressure washing for at least 24 hours (or as instructed).
- Inspect again after a few days of normal driving to ensure nothing has shifted or loosened.
If you’re not confident DIYing, many body shops or 4×4 specialty shops can handle flare installation professionally.
Costs, Common Pitfalls & Maintenance Tips
Upgrading flares is not without its potential issues and upkeep. Here are what to expect and how to avoid problems.
💸 Typical costs
- Basic raw ABS flare kits: moderate cost
- Color-matched / premium material kits: higher cost
- Add-ons: painting, primer, sealing, hardware, labor
- Professional installation can significantly increase total cost
- Always budget ~10-20% extra than kit cost for consumables, adjustments, and unforeseen issues
⚠️ Common pitfalls & what to watch out for
- Poor adhesion / tape failure — if mounting surfaces not perfectly prepped, adhesive may lift over time
- Rubbing or interference during turning, suspension travel — especially if clearance hasn’t been tested
- Mismatched flare size / contour — result in gaps, misalignment, or ill-fitting appearance
- UV damage / fading / cracking — low-quality plastic can degrade over time
- Paint chipping or finish mismatch — if paint matched poorly or not correctly prepped
- Interference with body trim, fender liners, wiring — some kits require trimming or re-routing
- Legal / registration issues — if flares don’t sufficiently cover tires as per local law
🔧 Maintenance & care tips
- Wash flares gently — avoid harsh chemicals that degrade adhesives
- Periodically check tightness of hardware and inspect for lifting edges
- Wax or seal plastic flares using plastic-safe sealants to protect against UV
- Touch up chips or scratches early to prevent further damage
- In cold climates, inspect for cracking or separation due to thermal cycling
- If a part gets damaged, repair quickly before spreading stress
With proper care, high-quality flares can last for many years without major issues.
Conclusion
Upgrading to flares on a Toyota 4Runner is a smart way to combine function and style. Whether you want to run wider tires, protect your body panels, or simply give your rig a more aggressive presence, the flare upgrade is a popular and effective mod in the 4Runner community.
To recap:
- Flare upgrades extend the wheel arch to provide more clearance, coverage, and aesthetics
- The benefits include tire fitment flexibility, body protection, mud/rock defense, and styling
- There are various styles — OEM look, pocket / bolted, extended / wide, adhesive vs bolt, painted vs raw
- Choosing wisely means considering your tire setup, mounting method, material quality, and finish
- Installation involves careful prep, dry fitting, adhesive/bolts, alignment, and finishing
- Costs range depending on brand, finish, and labor, and you must avoid common mistakes like poor adhesion, interference, or mismatched models
- Maintenance is key: periodic checks, cleaning, tightening, protecting from UV
If you tell me your 4Runner’s year, trim, and your wheel/tire setup goals, I can help you pick the ideal flare kit and even send you a step-by-step install guide specific to your rig.


